Software and Tools
Information about Software and Tools used by Controllers
vATIS
Since ES v3.2.2 it is possible to have up to 4 simultaneous ATIS-connections, however in Sweden we use vATIS. vATIS offers the same number of ATIS connections, but also easier addition of RWYCC (Runway condition codes) and NOTAMs as free text.
To use vATIS you need to download the software itself, and import a profile, both of which are linked below.
vATIS
vATIS Sweden Profile
The profile is updated automatically when a new version is found.
Documentation and more information available on the vATIS website.
https://wx.awos.se/ and VatIRIS shows real life AWOS/ATIS for many airports in Sweden.
ATIS formatting
We use vATIS to simulate as closely as possible both voice ATIS and D-ATIS (datalink ATIS in text format). Therefore it is important to use the correct text format to ensure that both the ATIS text looks reasonable, using plain language or common abbrevations (contractions in vATIS terminology), and that audio output is sensible.
Always check that the ATIS output is reasonable, especially when using free text in the AIRPORT CONDITIONS or NOTAMS fields. vATIS may not recognise certain abbreviations. If this is the case use plain language instead. ATIS output can be checked by selecting "Get ATIS" for the relevant ATIS in the ES controller list. Audio output can be checked by using the sandbox feature in vATIS or by adding the relevant ATIS and listening to its frequency in AFV.
LVP:
When LVP is in force it can be added to the AIRPORT CONDITIONS window with LVP as free text, or activated by clicking on the AIRPORT CONDITIONS text above the text field, and selecting LVP in the list.
Adding free text in AIRPORT CONDITIONS and NOTAMS windows:
AIRPORT CONDITIONS window:
- The AIRPORT CONDITIONS window is used to add runway conditions (SCCs - see below) and other conditions such as Low Visibility Procedures.
- SCCs (surface condition codes) can be added as free text to the AIRPORT CONDITIONS window. In the real life AWOS, the text is manually entered as free text, which means there are some variations to the formatting and abbrevations used.
NOTAMS window:
- NOTAMs can be added as free text to the NOTAMS window:
- e.g.
TWY Y3 CLSDorGLIDE PATH RWY 17 OUT OF SERVICE
- e.g.
- The NOTAMs window is also used to add information such as:
- Conditions on the movement area:
TWY AND APRON POOR SINGLE RWY OPERATIONS,CDM IN USEand similar information.
- Conditions on the movement area:
Text formatting:
- vATIS interprets certain phrases and abbrevations differently depending on context.
Y3will be read out as "why three" whereasTWY Y3will be read out as "taxiway Yankee three".- Runway designators will only be interpreted correctly if preceded by
RWY, i.e. writeRWY 01Linstead of just01L.
- For runway conditions copied from real life AWOS or SNOWTAM, you may need to edit certain phrases or formatting. Examples:
- Generic format, as used by most ATIS where a single runway is in use:
SURFACE CONDITION CODE 3 3 3. DOWNGRADED. ISSUED AT 1944 RWY 100 PCT 3 MM WET SNOW. TWY AND APRON POOR - The format used by ESSA AWOS (see below):
RWY 01L SCC 5 5 5. ISSUED AT 1800. RWY 100 PCT WET. CHEMICALLY TREATED.Note that the contractionSCCis recognised by vATIS only at ESSA. For other ATIS stations, use plain text. - SNOWTAM format:
ESNN 02291436 16 5/5/5 100/100/100 NR/NR/NR WET/WET/WET.- The "raw" SNOWTAM text in the example above would have to be formatted as free text to be properly interpreted by vATIS, like this:
SURFACE CONDITION CODE 5 5 5 RWY 100 PCT WET
- The "raw" SNOWTAM text in the example above would have to be formatted as free text to be properly interpreted by vATIS, like this:
- To indicate coverage of 25/50/75/100%, the formats
25PCT/50PCT/75PCT/100PCTare accepted. Note that for example50 PCTwill not work as vATIS interprets two numbers after the word RWY/runway as a runway number. - When a contamination depth is included, make sure there is a space before
MM(i.e. make sure it says1 MM, not1MM). Note that for the most common reported contamination depth of 3 mm, the phrase3MM(without space before MM) has been added for convenience. For other depths, make sure to add a space before MM as described above.
- Generic format, as used by most ATIS where a single runway is in use:
- Use punctuation as needed where a pause is desired in the spoken output. When adding AIRPORT CONDITIONS or NOTAMS free text, always end the phrase with a period (.). This ensures that the spoken ATIS makes a brief pause before reading the next item.
When adding or pasting free text to the AIRPORT CONDITIONS or NOTAMS fields, take care to remove colon symbols ( : ) or double spaces ( ) where included, as the remaining text after will be ignored if the symbol/double space is not removed.
Note: Text added in the AIRPORT CONDITIONS and NOTAMS fields will remain in place for that preset until it is edited or deleted (including after closing and re-opening vATIS). Pre-defined airport conditions (such as LVP) will also remain in place until deselected. When setting up an ATIS, make sure that no old/irrelevant ATIS text is present.
ESSA ATIS set up and formatting:
- AWOS for ESSA which shows real life runways in use as well as runway surface conditions is available at https://wx.awos.se/?siteId=ESSA.
- In vATIS, there are one or more presets for each runway combination. Some runway combinations have separate presets for IMC and VMC conditions (the phrase "additional spacing on final due to runways in use" is added to the IMC preset). Take care to select the relevant preset!
- Runway surface conditions can be added by pasting the info from AWOS. For the text to be displayed and read out correctly by vATIS, it needs to be in the correct format:
- The "raw" text from AWOS might look like:
01R: SCC 5 5 5. ISSUED AT 18:57. RWY 100 PCT DRY SNOW 2MM. TWY P APN P. - This needs to be edited to the correct format for vATIS. Include
RWYbefore the runway designator, remove any colons and make sure there are spaces and punctuation where needed. Some abbreviatons may need to be changed into plain language. The above example when edited to suit vATIS should look like this:RWY 01R SCC 5 5 5. ISSUED AT 1857. RWY 100PCT DRY SNOW 2 MM.and be added in the AIRPORT CONDITIONS window. Taxiway and apron conditions should be edited as needed and added in the NOTAMS window:TAXIWAYS POOR. APRONS POOR. - For DEP ATIS, include surface conditions for the departure runway only, as well as taxiway and apron conditions.
- For ARR ATIS, include surface conditions for the arrival runway only, as well as taxiway and apron conditions.
- AWOS lists the runway conditions based on the lowest runway designator, e.g. the conditions for RWY 01L/19R, 01R/19L and 08/26 will always be listed for RWY 01L, 01R and 08. In the ATIS, this needs to be adjusted to reflect the runway direction in use so you may need to manually change it to RWY 19R, 19L and 26.
- When independent parallel approaches are in use using the EoR concept, the following phrase should be added to AIRPORT CONDITIONS in the ARR ATIS, depending on runway in use. This is also selectable as a pre-defined phrase via the AIRPORT CONDITIONS window.
- ARR 01R/DEP 01L:
INDEPENDENT PARALLEL APCH IN OPERATION. SECONDARY APCH RNP Y RWY 01L - ARR 19L/DEP 19R
INDEPENDENT PARALLEL APCH IN OPERATION. SECONDARY APCH RNP Y OR RWY 19R
- ARR 01R/DEP 01L:
- When CDM is in use, the phrase
CDM IN USE.should be added to NOTAMS in the DEP ATIS. The phrase is selectable as a pre-defined phrase in the NOTAMS window.
- The "raw" text from AWOS might look like:
In real life, the ATIS designator letter for DEP ATIS and ARR ATIS are usually different. This might be inconvenient on VATSIM as there is no practical way to display both ATIS letters in ES. Therefore it may be preferable to use the same letter for both DEP and ARR ATIS.
vacs
VATSIM ATC Communication System (vacs)
is an open-source, cross-platform Ground-To-Ground Voice Communication System for VATSIM.
In some situations Discord may still be the desirable coordination tool as it most closely resembles face-to-face coordination, as it is done where controllers IRL sit next to each other.
Handover coordinations are preferably done in Discord.
Download vacs
vacs v2 automatically loads the appropriate profile for your position.
No local profiles are needed, the dataset (including profiles) is kept "in the cloud".
See vacs User Manual for more information
Verbal Coordination Etiquette
-
Before initiating a call, select the appropriate call source for that specific call (see VACS User Manual above!).
Pressing the button corresponding to the source station makes the button light up in light orange (when the source is temporary, i.e. to be used for for the next call only). Pressing the button twice makes the call source fixed, i.e. the same source will be used for all outgoing calls (the button lights up in dark orange).
It is highly recommended to configure a fixed call source representing the station you most frequently call from. This ensures that outgoing calls use the correct caller by default and avoids the need to manually select a call source for every call.
If a call source is not selected, the incoming call will show up with the VATSIM login callsign, i.e. ESOS 1 CTR instead of OS 1.
-
When initiating a call, select the station/sector you want to reach; the call will automatically be routed to the correct controller.
-
The controller picking up should respond with the name of the position shown in bright green. This is the station the initiating caller selected and is expecting to talk to.
Example:
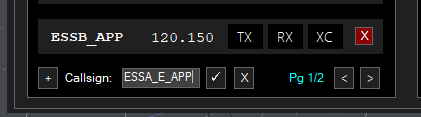
ESSA_E_APP and ESOS_1_CTR are online. ESSA_E_APP covers the whole TMA, i.e. positions ARR-E, ARR-W, APP-S and DEP positions. ESOS_1_CTR covers ESOS sectors 12346789.
How do you make a call concerning a flight to ESSA around ELTOK?
1. The traffic would be in ESOS sector 8.
2. The traffic will enter the TMA in sector W, i.e. covered by ARR-W.
This means that if ACC wants to call APP concerning this traffic, the call source should be selected as ESOS 8 (OS 8) and ARR-W should be the selected destination station. This way both controllers know even before starting the call that the coordination concerns sectors ARR-W and ESOS sector 8 and should identify themselves accordingly, i.e. as "Arr West" and "[Sector] 8" (not "Arr East" or "Stockholm sector 1" as could be implied from the login callsigns ESSA_E_APP/ESOS_1_CTR). -
When responding, the unit name (Stockholm/Malmö/Göteborg etc.) may be omitted when there is no risk for confusion.
-
Identify the traffic you are talking about, with as much detail as needed e.g. "inbound ELTOK, SAS123" or "east of your TMA, transponder 7000, indicating 2000 ft" with response "identified/radar contact", as we are unable to physically point out traffic on the screen of the other controller.
-
Be clear and concise, keep coordination brief and use standard ICAO/TSFS phraseology.
"Sharing" positions
When more than one controller is active on the same position simultaneously, all will receive the same inbound calls, the first controller to respond will be connected to the call, in that moment the incoming call is ended for all other controllers on the same position.
This functionality allows both mentors and students to be connected to vacs during training, or to use it in a E/P (Executive/Planner) configuration if desired.
Group calls are not available, but is planned to be added in a future version.
Phone Directory / Direct Calls
If you want to call a controller not shown to you on any tab, they can be found in the phone directory: ☎️->Dir.
Calls can also be initiated using the Dial Pad, entering a controllers CID.
Reporting bugs and getting support
vacs Discord Server
vacs GitHub Issues
AFV (Audio for VATSIM)
Since 2018 VATSIM is using a new voice codec, reducing latency and increasing voice quality.
Euroscope has not yet been updated to natively integrate and support the audio client, therefore requiring one of the following standalone audio clients to be able to communicate via radio:
- TrackAudio client (scroll down to assets and download the latest .exe file)
- (Audio for VATSIM standalone client) - No longer officially supported as it is abandonware.
The latest recommended version of TrackAudio is 1.3.4-beta2. Users report reccuring crashes with newer versions.
Crosscoupling
When manning positions covering large areas with the use of several tranviecers (e.g. ESOS_3_CTR) controllers are urged to cross-couple (XC, XCA in TrackAudio) their frequency, even if using a single frequency, this helps pilots hear each other even when outside of their local radar range.
Relieving positions
When relieving positions, make sure to manually add and select the correct position callsign in the audio client, as this is the only way to ensure the correct trancievers are being loaded. (See picture below)
VatIRIS
Overview
VatIRIS is an interpretation of its real-world counterpart:
IRIS - Integrated Real-time Information System,
adapted and extended for use by VATSIM controllers in Sweden.
IRIS is designed to provide real-time information to various aviation facilities. It integrates and displays critical information such as air traffic data, weather conditions, and navigational aids into one flexible, role-based presentation.
Purpose of VatIRIS
VatIRIS can be used to:
- Provide situational awareness for air traffic controllers by combining previously separate data into one interface.
- Improve safety and operational efficiency for airports by allowing seamless communication between controllers and other operational systems.
User Interface
The different modules in VatIRIS are contained in a GUI similar to Windows or MacOS with resizable windows for each module.
Window snapping is enabled by default but can be disabled under SYSTEM -> SETTINGS if desired.
Modules
Below are some examples of the different types of information that the different modules can show:
-
Dynamic Information
- Real time weather data (METAR, TAF, Weather sensor values, Weather map).
- ECFMP Flow measures.
- Airspace Occupancy data.
- PLS data.
-
Static Information
- AIP (Aeronautical Information Publications).
- Pushback procedure maps.
- Manuals and regulations (LOP, GOP etc. from Wiki)
- Tactical directs (DCT)
Data timestamps
Most modules show a timestamp in the top right corner of each window.
The timestamp is not shown at all if not relevant (e.g. for data from Wiki and AIP).
Sometimes the timestamp only shows (in red) when the data is outdated (METREPORT and METSENSOR).
Logging in using VATSIM Connect is required to access most features, saved presets etc are also stored connected to your account, this manual assumes you are logged in to IRIS.
Saving/"Installing" VatIRIS an app
Using IRIS as a standalone "app" (PWA - progressive web application) instead of within a browser is recommended. Below you can find guides on how to for the most common web browsers.
The Menu Row
All modules/windows can be opened using the menu row,
A short description of the first level of buttons are shown below, modules that can be opened using a button are described in their entirety under Module Descriptions.
System Menu
To the left in the menu bar you'll find the following buttons, affecting the general behaviour of IRIS system-wide.
Main Toolbar
Global Search
The global search function can be used to quickly find the module you are looking for.
The global search can be accessed by pressing the search icon in the menu row, alternatively with the button combination Shift+Space or Shift+Enter
Module Descriptions
MET - Meteorological information
AIRPORT
Showing a combined view of SUN, METREPORT, TAF and METSENSOR.
METREPORT
Showing decoded weather data parsed from one of the selected data sources depending on view mode.
View modes:
Only available sources for the respective airport is shown. The data source is automatically switched to the preferred source when one becomes available (A>W>M).
Updated data (blue flash):
When new data is available for the selected data source:
- The window for that airport flashes in blue.
- All text turns blue after the window has flashed.
Left click anywhere in the window to reset the "blue flash" to indicate that you have seen the update.
This is enabled by default but can be disabled under SYSTEM -> SETTINGS if desired.
Legend

- ESGG - Airport designator (Göteborg Landvetter).
- YAN - ATIS letter (YAN=Yankee).
- 241125 - Date YYMMDD (2024-11-25).
- M W A - View modes (show above).
- M for METAR.
- W for WX.AWOS.
- A for VATSIM ATIS.
- RWY 21 - Runway in use. (see below for more info on RWY indicators)
- 251520Z - Date of the met report DDHHMM (25th 15:20z).
- WIND - Wind.
- VIS - Visibility.
- -RA - Precipitation, ("-RA" meaning light rain might also be shown as "FBL RA").
- CLD - Clouds.
- T09 DP08 - Temperature and dewpoint in Celsius, (minus shown as "MS"=TMS12=Temperature minus 12).
- QNH 0995 ⯈ HPA
-
QNH Trend Arrow - Shown to the right of the QNH value.
The trend arrow indicates if the QNH has changed since the last update or not. Sometimes this arrow appears after the first time data is changed/updated.
- QNH increased: ⯅
- QNH same: ⯈
- QNH decreased: ⯆
-
- TRL 70 - Transition level (calculated from QNH or loaded from ATIS/WX.AWOS, depending on view mode).
- SURFACE CONDITION CODE(...) - Used entered NOTAM / Airport conditions, shown only in WX.AWOS and ATIS view modes.
Runway suggestion indicator in METAR view mode - Suggested RWY with the best headwind component (or airport-specific preferred runways in light winds) is shown.
Runway mismatch indicator in ATIS view mode - Compares the RWY in use between VATSIM ATIS and WX.AWOS data and highlights the runway in use as follows:
- RWY 21 - No mismatch (ATIS runway matches WX.AWOS)
- RWY 21 - Mismatched runway (ATIS runway differs from WX.AWOS)
At Stockholm Arlanda (ESSA), both arrival and departure runways are monitored. A warning is shown if one or both mismatches.
Greyed out information in WX.AWOS view mode - the ATIS letter and RWY designator are greyed out from AWOS view mode when a VATSIM ATIS is available:
- YAN and RWY 21 - VATSIM ATIS available, no mismatch (ATIS runway matches WX.AWOS)
- YAN and RWY 21 - VATSIM ATIS available, mismatched runway (ATIS runway differs from WX.AWOS)
- YAN and RWY 21 - VATSIM ATIS not available.
METSENSOR
Showing weather data in real time (updated every minute, or more frequently).
Updated data (blue flash):
When new data is available the data field that was updated flashes in blue.
This is disabled by default but can be enabled under SYSTEM -> SETTINGS if desired.
Legend
The data is displayed in three separate columns, depending on which sensor and where it is located (03 M 21), below an example for ESGG.

- MEAN02 - Mean wind, this is the wind given to the pilot at takeoff and landing clearance.
- VRB - Wind variable between
- only given to pilots when present in METREPORT.
- MIN/MAX - Minimum/maximum wind
- only given to pilots when present in METREPORT.
- COMP - Wind component.
- +08/L03 shows 8 knots tailwind component and 3 knows crosswind component from the left.
- RVR - Runway visual range
- given to pilots on request or during LVP.
- VIS - Visibility.
- PRW - Precipitation.
- CLD - Clouds.
- QNH - QNH
- rounded down when given to pilot/shown in met report.
- TRL - Transition level.
- QFETHR - QFE for the respective threshold.
- T SURF/BODY - Temperature at surface/body of respective runway
- QFE - QFE for airport elevation.
- T - Temperature in Celsius
- minus shown as "MS"=TMS12=Temperature minus 12.
- DP - Dewpoint in Celsius.
- HUM - Relative humidity, indicated in percent
- 100% if T and DP are the same.
WINDROSE
Showing a wind rose, indicating wind direction, speed, cross/head/tail-wind component etc.
AWOS data is used for airports where it is available, METAR data will be used where no AWOS data is available, there is no way to manually select which data source to use.
Everything in the middle of the circle shall be read out to the pilot, what is shown is automatically filtered.
Legend

The module will default to display the runway with the highest headwind component.
- Runway selector, choses which wind anemometer (wind sensor) to use if several are available, this also affects the wind components shown in 5.
- Mean wind direction and speed (2-minute average, MEAN02 in metsensor).
- Values shown in the circle shall be read to the pilots!
- ≤60 degrees direction span (250-320 degrees in the example above) are shown.
- ≤180 degrees shown as VRB.
- ≤10 knot difference between mean wind speed and MIN/MAX speeds are shown.
- Values shown in the circle shall be read to the pilots!
- The compass rose
- The red line indicated the mean wind, coming from 280 degrees in the example above (2-minute average, MEAN02 in metsensor).
- The yellow arc indicates the variable wind (10-minute average), variable between 250 and 320 degrees in the example above.
- The dark grey thick line indicates the selected runway and its direction, 08/26 in this case
- MIN/MAX (GUST if METAR data) wind shows the minimum and maximum winds.
- The MIN/MAX/GUST wind is shown in bold if it shall be read to the pilots (≤10 knots difference between 2-minute and 10-minute min/max wind speed).
- The head/tail-, and crosswind component indicators, this is affected by the runway selected in the top right corner. The example shows 2 knots headwind component and 1 knot crosswind component from the right for runway 26.
METAR/TAF
Shows raw METAR/TAFs.
- METAR - Toggles visibility of METARs
- TAF - Toggles visibility of TAFs
- AERODROMES - Selects which aerodromes are shown
Aerodromes not listed can be manually added using the text field.
SMHI
Shows SMHI "weather radar" from https://portaler-lfvradar.smhi.se/sverige
The map displays precipitation intensity, along with lightning strikes detected by lightning sensors.
New images are available every 5 minutes.
Legend

SWC NORDEN
Nordic significant weather chart.
Legend available here.
VFR
VFR analysis chart - This chart provides a quick and clear overview of weather conditions relevant to Visual Flight Rules (VFR).
SUN
Shows sunset/sunrise and day/night times.
- "Separation VFR" is shown during nighttime when VFR needs to be separated.
NOTAM - Notice To Airmen
Shows information about facility/service/procedure availability and hazards, such as taxiway/runway closures etc.
The NOTAMs can be filtered by aerofrome.
ECHARTS - LFV eCharts
Shows (a custom version of) LFV eCharts, where you can view airspace/waypoint information etc.
FLIGHT - Flight List
ARR DEP
Shows a list of flights to/from the selected aerodromes.
FLS Flight suspensions
If a flight is suspended in the vIFF system, the STD will be shown in bold red, with the tooltip FLS - Flight Suspended, update EOBT. Left clicking will open the IFF Actions window with the callsign of the affected flight pre-filled to send a DLA (Delay) message.
CTOTs
CTOTs from the vIFF system are shown when present.
- R shown next to CTOT - REA message sent.
- S shown next to CTOT - SIR message sent.
CTOT - Calculated Take Off Time - Regulating when a flight is allowed to take off to avoid delays.
Often referred to as a slot time, take off is allowed within the CTOT window (-5 to +10 minutes of CTOT).
Active ECFMP flow measures are taken into account during CTOT calculations.
Hovering a CTOT will also show the EOBT and the issuing reason for the CTOT.
- Flow reason ending with
-Hor-Oimplies an airspace capacity restriction (Hourly entries/Occupancy).ES-M23W-H- ES - Sweden
- M23W - Malmö sectors 2,3,W
- H - Hourly entries (too many aircraft entering the airspace at once)
- Flow reason
XXXX(ICAO of an airport) implies the arrival capacity of that airport. - Other flow reasons may be
Left clicking a CTOT will open the IFF Actions window (see below)
ATFCM - Air Traffic Flow and Capacity Management
ECFMP
Shows flow measures from ECFMP - European Collaboration & Flow Management Project.
Legend

The measures are displayed in three different colours depending on the state of the flow measure:
- Active - This flow measure is presently in effect.
- Expired/Withdrawn - This flow measure is no longer in effect.
- Expired=The end time has passed.
- Withdrawn=The flow measure was cancelled before the end time has passed. (End time column shows withdrawal time)
- Notified - This flow measure will become active within the next 24 hours.
- Expired/Withdrawn - Toggles visibility of expired/withdrawn measures.
- Notified - Toggles visibility of notified measures.
- Reason - Toggles visibility of "Reason" column.
- New - Opens ECFMP website to add new measure (requires login and flow manager roles).
"ID" and "Filters" columns can be filtered using the text fields
Enter " ES" in filters so see all measures mentioning any Swedish airport.
When hovering the mouse over a measure type a description is shown.
IFF Actions
Is used to send data to the vIFF system.
- REA "Ready" message.
- When ready for pushback/startup before EOBT
- SIR "Slot Improvement Request" message.
- Triggered by
Ctrl+SEND REA- Only for exceptional flights require high priority!
- Triggered by
- DLA "Delay" message (with new EOBT).
- EOBT can also be changed in Euroscope to remedy a flight suspension.
All IFF actions can also be triggered from within EuroScope if desired (except SIR).
DOCUMENTS - Wiki/AIP and other operational information.
MANUAL
Shows this manual from within IRIS.
BULLETINS
Shows Sweden FIR ATC Operational Bulletins Wiki page.
CHECKLISTS
Shows checklist for controllers, (to be used as reference, not necessarily "read and do") the following are available:
- Open position - For when opening position.
- When not taking over any airspace from already open positions.
- Close position - For when closing position.
- When no relieving controller is taking over position.
- Handover/takeover - For when other controller/position is relieving (taking over) your airspace/position.
- Runway change - For planning and coordinating a runway change.
QUICKREF
Shows Quick References/Appendices as available from Quick References/Appen... | Wiki
The runway configuration in use is automatically selected but can also be manually chosen.
GOP/LOP/LoA
Shows Wiki pages as available from ATC Sweden | Wiki
AIP
Shows AIP pages as available from IAIP – AD 2 Aerodromes
OTHER
Shows other operational information.
- ESSA PUSH - Pushback procedure charts
- ESGG PUSH - Reference to which pushback direction is available from which stand, and information regarding which stands are blocked when pushing back for the respective stand (shown as tooltip when hovering stand number)
Note that pilots may not follow the IRL pushback procedures, depending on usage of tools such as GSX, also depending on updated profiles etc etc...
CODES (ICAO)
Shows a searchable list of
- Aircraft types, showing ICAO type code, wake turbulence category, wingspan, MTOW etc.
- Callsigns, showing ICAO flight plan designator, operator and country.
- Aerodromes, showing ICAO code, name and country.
REGIONAL AD
Shows the "Regional Aerodromes Overview" created by Thomas Ljung, from VATSIM Scandinavia Forum
TEXT ALIAS
Shows a searchable quick reference to the text alias included in the Swedish GNG package.
- Auto - Toggle visibility of "Auto" aliases.
- FSS - Toggles visibility of "FSS" aliases.
NOTEPAD
Shows a notepad to write notes, such as non-standard agreements with adjacent positions etc.
TRAFFIC
Shows sector occupancy for the selected sector combination.
The X-axis shows time, the Y-axis shows number of aircraft in the selected airspace volume.
- - Indicates airborne aircraft.
- - Indicates aircraft on ground and pre-filed flight plans.
ATS
Shows ATC bookings for the coming two days.
SECTORS
Shows Otto Tuhkunen's dynamic ACC sectorisation map.
DCT
Shows tactical directs (quick reference to LoA, shown at TopSky-map).
PLS (only shown when PLS integration selected.)
There is a SIMPLE logic mode available, this is completely independent of the actual PLS system and will only show a timer of your time online (using the CID which you are logged in with in IRIS).
Configuring/activating PLS
- Activate PLS Integration under SYSTEM -> SETTINGS
- This displays the PLS timer and PLS icon in the menu bar
- Select your PLS logic mode.
- SIMPLE - Independent of the acual PLS system, showing the online session length automatically using your CID from VATSIM Connect.
- CID - To be used when controlling from home, the PLS timer will show no matter the status.
- POSITION - Only to be used when controlling at location during real live events etc.
- Enter CID/POSITION if needed (normally not needed if using VATSIM Connect).
Using PLS + Legend
- To "go on position": press the PLS icon and enter the position/callsign you are connecting with/as.
- To "go on break": press the PLS timer and confirm you want to go on break.
Legend (timer suffixes, only shown in CID logic mode):
- None - On position
- P - On break
- Ö - On break (Övrigt/other)
Postface
Changelog
There is no specific changelog available, however all changes can be viewed on Github - Commits.
Significant changes are normally also announced in the VatIRIS forum thread.
Contributing
Contributions of any kind are most welcome.
- If you find a bug or have a feature request/suggestion, please check that it doesn't already exist, if not, add an issue on Github.
- Github Pull requests are welcome.
Credits
To get in contact with the developers of VatIRIS (contact via Github might be preferred):
- Martin Insulander - 814118
- Discord @
mumrikki
- Discord @
- Max Kuhla - 1157125
- Discord @
maxlk96
- Discord @
- Among others.
AMAN (MAESTRO)
1. Background information
The issue and its solution:
Aircraft enter the TMA at several FFs (feeder fixes, the waypoint where the STAR begins). For landing, all aircraft must be sequenced. Here, the problem is building the optimal sequence of aircraft as there are several constraints involved (e.g. wake turbulence, runway specific rates depending on high speed exits, departure gaps). AMAN can calculate this sequence and display it to the controllers, which in turn can act on it when deciding who is allowed inbound without (further) delays, or if holding, who may leave the hold and when.
An arrival manager (or AMAN) works as follows:
- An aircraft approaches a horizon of 150-200 nautical miles, AMAN captures it, calculates its ETA and inserts it in the sequence along with the others already there.
- In the ATCC, the TMA supervisor receives and validates the sequence provided by the AMAN and makes the necessary changes as needed.
- The advisories (Time to lose/Time to gain) that AMAN provides for each aircraft are transmitted to the en-route controllers, which they communicate with the aircraft and apply the appropriate delays or time savings.
2. Introduction
Note: The MAESTRO plugin is WIP and may contain bugs, if you think you have found one, let the developer know via the VATSCA Forums.
2.1 Implementation (and limitations) on VATSIM:
The MAESTRO plugin emulates the AMAN tool with the same name, developed by Egis-Avia (now Thales), in use at EFHK, EKCH, ESSA among others. Its functionality is limited compared to the real systems, however it can be useful in helping virtual controllers monitor and manage inbound flows and delays to one or more airports.
The calculations are based on the predictions provided by EuroScope and its programmed data, so to get useable results, it is important to keep the aircrafts’ data updated. The most common problems are:
- Wrong landing runway:
- the aircraft won’t be included in the correct runway’s sequence at all.
- Old direct-to clearance stuck:
- the aircraft’s position in the sequence will be based on the predicted ETA which will be off by hours in the worst case as it assumes the aircraft turns back to that point.
- Calculated sequence not being followed:
- the whole sequence behind the affected aircraft is delayed until the sequence is manually corrected or the situation resolves itself as aircraft arrive and are removed from the sequence.
Note:The plugin can only be used for one airport group at a time. (If you select ESSA, also traffic to ESSB will be shown)
2.2 Interpreting and acting on generated data:
Example:
- SAS904 is inbound ESSA via ELTOK (ETA at ELTOK 17:35).
- AMAN with help of EuroScope estimates, via the programmed STAR, it will take him 11 minutes flying from ELTOK to touchdown (on the selected runway).
Without delays, SAS904 would land at 17:46 - Because of a peak in arrivals to Arlanda, the first available landing slot is at 18:00
- AMAN calculates the difference between SAS904s present ETA at ELTOK (17:35) and his STA (scheduled time or arrival) [18:00 - 11 minutes = 17:49].
- The difference between his ETA and STA over ELTOK is calculated [17:49 - 17:35 = 14 minutes].
- SAS904 has 14 minutes to lose (to fit into the sequencing calculated by AMAN), this is called his current delay, or TTL (time to lose).
- Depending on the TTL, delaying vectors, speed restrictions, or holdings may be given, to comply with the STA overhead the FF.
- 14 Minutes is aproximately 3 or 4 patterns in a holding, depending on the outbound time.
-
The time to lose (or to gain, when shortcuts are beneficial for the sequencing) is presented to the controller, and continously updated, freeing him from all manual calculations.
(This allows the controller to inform the pilot in holdings when to expect further clearance, which is the same as his STA (17:49))
Note: For actual operational procedures with AMAN in use: see 3.6
2.3 Timeline and Glossary
- STA: Scheduled time of arrival - flow planned arrival time by AMAN.
- ETA: Estimated time of arrival - estimated using the FLEG route within Euroscope.
- FF: Feeder fix - the waypoint where the STAR begins.
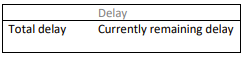
- Current delay: How much delay is needed to reach RWY at STA - Current ETA RWY-STA RWY.
- Total delay: Initial ETA RWY-STA RWY - (i.e. for holding traffic, the total delay will increase)

3. Plugin usage and procedures
Some information is excluded or simplified for ease of understanding and use, for more detailed information on the inner workings of the plugin, see the included manual in the .zip package.
3.1 Plugin installation
MAESTRO
The Swedish GNG package contains the latest beta version of the MAESTRO plugin by Juha Holopainen.
TopSky
The Swedish GNG package contains a version of TopSky that automatically receives MAESTRO data for ESSA/ESSB and EKCH when updated data is available.
3.2 Operation modes
3.2.1 Standalone mode
The plugin calculates its own data (can be useful for testing the plugin for the first time, not sharing any sequence data)
This mode can also be selected to disconnect from other previously selected modes.
3.2.2 MASTER mode
The plugin calculates its own data, and shares it as follows:
- Web - Data is uploaded to a server
- Local - Data is saved to the local computer to be used by other EuroScope instances
- Web+Local - Both of the above
3.2.3 SLAVE mode
The plugin receives its data from an outside location depending on the settings:
Note: TopSky automatically receives MAESTRO data from the server to show in aircraft labels and traffic management lists without the need to connect in MAESTRO.
You only need to connect via MAESTRO if you want to view the data on the MAESTRO timeline.
- Web - Data is downloaded from a server
- Local - Data is read locally
- Web+Local - Data is downloaded from the server, and then saved to the local computer to be used by other EuroScope instances
Note: All three AMAN operation modes work regardless if you are connected as an active controller or OBS.
The relevant operation modes for live operation on VATSIM are:
• MASTER (Web+Local)
• SLAVE (Web+Local)
The persistent use of (Web+Local) should allow the planned sequence to be kept if MASTER is changed (see 3.8).
When using several instances of EuroScope, the secondary instances are to be connected as:
SLAVE (Local)
3.3 General Operation
The COTS and AMAN windows can be moved by dragging them from the title bar. Other windows are non-moveable.
- Left-clicking on the button above AMAN in the COTS Window opens the AMAN Window.
- Windows are closed by left-clicking the box in the top right corner.
- Windows are resized by dragging the box in the bottom right corner.
3.3.1 The AMAN Window:

- The current airport (left-click to open the Setup Window)
- The runway rates (left-click to open the Change Rates Window)
- The measured actual rates during the past 30 minutes and deviation from set values
- The sequence in numbers: aircraft past the FF (TMA), and the total number of aircraft (TOT)
- The current operation mode, empty for standalone mode. (MASTER/SLAVE, the SI of the controller, local/web/web+local)
- The UTC time when the data was last refreshed
- Opens a menu to scroll between the FFs when in ACC and FLOW view mode, including an option to toggle visibility of the panels marked in red (1-6)
- Changing between the three view modes: (See 3.3.2)
- The “Desequenced” button displays the number of De-sequenced flights, (left-click to open the De-sequenced List).
- Current UTC time (left-click to open the Labels Window, changing what is displayed in the flight label)
- Scrollbar (Can be moved by dragging the bar itself, or by clicking on the background area next to the bar. Left-clicking changes the setting by one unit, right-clicking by 10 units, double-click to resume to default view)
- The flight label, from left to right (left-clict to open callsign menu)
• Current delay (Color depending on how long the delay is)
• Aircraft callsign (Color depending on flight state)
• STA RWY or FF depending on view mode
(When in holding: the time in which the FF shall be passed, inbound TMA.) - The timeline, upwards on the scale indicates the future. defaulting to show current time at bottom. As time progresses, the scale automatically moves from top to bottom (To scroll, see 10.).
3.3.2 The view modes:
| View Mode | Timelines | A/C Position on Timeline |
|---|---|---|
| Runway | One for each active arrival runway | RWY STA |
| FLOW | One for each pre-defined feeder fix group One for flights not routing via any of the defined feeders |
|
| ACC (Feeder) | FF STA |
Recommended view mode:
• ACC: ACC mode
• APP: Runway mode
Note: The ACC view is new since v1.1b3, it shows FF STA on the timeline instead of RWY STA.
3.3.3 The Flight Information Window:
The Flight Information Window can be opened from the callsign menu (see 3.3.1 -> 12), it displays flight related data. as follows:


3.3.4 The De-sequenced List:
The “De-sequenced” can be opened from the main AMAN window (see 3.3.1 -> 9), it contains flights temporarily removed from the sequence. They are presented in the same order as they were entered into the list. Left-clicking one or more callsigns highlights them. The “Resume” and “Remove” buttons can then be used to either re-enter the highlighted aircraft back into the sequence or remove them from it permanently.
3.3.5 The TopSky track label:
Note: TopSky automatically receives MAESTRO data from the server to show in aircraft labels.

When AMAN is active for an airport, for arrivals having a predicted sequencing, the current delay is displayed in line 0 of the track label in minutes, with one of the following prefixes:
- L (Lose) for time to lose (Delay)
- G (Gain) for time to gain (FF ETA is later than the FF STA)
3.3.6 The Traffic Management Lists
Note: TopSky automatically receives MAESTRO data from the server to show in the TMLs.
See TopSky Profile - Traffic Management List 1 & 2 to see the data fields showing AMAN/MAESTRO data.
3.4 Flight states (and their colors)
Flight labels are color-coded according to their states which are based on the time from the airport and the feeder fix, except for the delay items whose coloring depends on the amount of delay,
- UNSTABLE (More than 12 minutes from the FF - The sequence is recalculated on every position update)
- STABLE (Within 12 minutes from the FF - No plugin-initiated changes to the sequence)
- SUPERSTABLE (Within 8 minutes from the FF - No plugin-initiated changes to the sequence, except for missed approaches re-inserted into the sequence)
- FROZEN (Within 5 minutes from landing - No plugin-initiated changes to the sequence, except for the detected actual order on final)
- LANDED (Flights considered as landed)
Note: An aircraft disconnecting will always initiate a resequencing by the plugin.
Note: A flight still in UNSTABLE state can not be manually manipulated until it is turns STABLE.
3.5 Interacting with flight labels and the timeline
Terminology:
- Slot - During a slot no arriving aircraft will be calculated to land.
- A slot can either bound to a specific flight (by clicking on a flight label), or specified as a time period (by clicking on the time line when in runway view mode, see 3.3.8)
- Slots can be useful for manually planning departure gaps, short runway closures, or runway changes.
If managing a runway change using AMAN, it is recommended to set the planned arrival runway manually for each aircraft (to prevent problems when changing the runway set as active for arrivals in EuroScope)
3.5.1 Callsign menu
Left-clicking on a flight label opens the callsign menu with the following options:
- Recompute Recomputes the flight’s data
- Change Runway - Opens the EuroScope menu to set the arrival runway
- Insert Slot - Opens the slot submenu (a value of 0 minutes removes the slot)
- Remove - Removes the flight from the sequence
- (The rest of the options are not implemented)
Note: Recomputing or moving a flight may become necessary when it is no longer in the unstable state (so its position in the sequence is fixed) and can no longer meet its calculated time profile, starting to delay all the flights behind it in the sequence.
Note: Disconnected flights will stay in the sequence for 10 minutes unless manually removed
(If a flight that is still online is removed from the sequence, it will be automatically added again).
3.5.2 Timeline menu
Left-clicking a timeline opens a menu with the following options:
- Insert/Modify Slot Opens the Slot Modification Window (only available in the Runways view)
- Insert Flight Allows to type in a callsign already in the sequence to move into that position
3.5.3 Manually adjusting the sequence
Changing the generated sequence can be done in the AMAN window in following different ways:
- By dragging a flight label to the wanted position in the sequence
- Left-click on a time in the timeline, select "add flight" (can be done to already existing flights)
- Left-double click a flight label (the label becomes boxed), then select another another flight label, the two will swap its positions in the sequence
When manually adjusting the sequence, a confirmation window will always be opened, asking to confirm or cancel the operation.
A flight still in unstable state cannot be moved.
Note:
Moving/adding a flight in only changes position in the sequence. The exact time in the timeline where the flight is placed is calculated by the EuroScope FLEG
3.6 Roles, responsibilities and procedures
In real life. Stockholm (ESOS) receives (and transmits) AMAN data for ESSA. Malmö (ESMM) ATCC additionally receives AMAN data for EKCH also. The MAESTRO tool is managed by APP-C for the arrivals into Arlanda.
The following positions may be responsible managing the arrival sequencing to Arlanda using AMAN as MASTER, beginning with the highest and progressing to the lowest priority:
- ESSA_C_APP (No active frequency)
- ESOS_PLN_CTR (Separately approved frequency. 123.975)
- ESSA_E_APP (When no separate planner is online. 126.650)
- ESOS_1_CTR (When ARR-E is not separately manned)
Note: Any controller not responsible for managing AMAN may receive data as SLAVE.
ESMM may receive data about the planned sequencing into Arlanda, they do however not act on it, unless requested to by adjacent ESOS sectors (probably as it is too early with a relatively unstable sequence, unless severe delays are indicated/expected).
Mainly the ESOS-sectors adjacent to Stockholm TMA monitor and judge/act on the AMAN data.
The position acting as MASTER shall keep manual changes to the sequence to a minimum
Suggested procedures when AMAN is in use (ONLY after prior coordination):
When only parts of the sequence is indicating a delay, ESOS ACC does not have to act on that information.
If all inbounds show several minutes to lose, consider holding or delaying inbound traffic as appropriate
(Use common sense, TTL and TMA/TOT numbers may help in judging this)
At times of higher workloads in the TMA, it is preferable that ACC hands over traffic excactly according to FF STA (no more "current delay" remaining).
3.7 Getting started
So now you've read through the entire wiki page and the pdf documentation? Great! What's next?
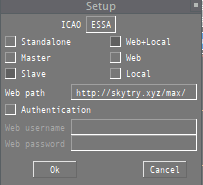
Open the Setup window (see 3.3.1), enter the airport identifier in the ICAO window, select the desired operation mode.
After selecting operation mode, it should look like below:
To receive the web password for acting as MASTER, send an Email to max.kuhla@vatsim-scandinavia.org
or contact me via Discord (199890517914288128 or maxlk96)
MASTER:
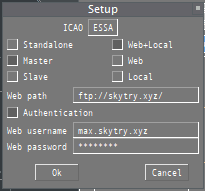
SLAVE:
Click "Ok", and get to work, sequencing, or observing the sequencing!
Note: You do not need to have the AMAN window open to keep receiving updates to the sequence.
(when working ACC, all the information you need is in the TopSky track label, if all is working as it should for the MASTER)
3.8 Tips and Tricks
Runway rates:
The runway rate preset in the system is defined by enviromental factors (high speed exits, runway used for departure simultaneously).
The actual available rate might be limited by human factors, such as:
• Controller capacity and experience (how consistent spacing can be produced)
• Pilot reliability (how quickly do they react, and how compliant are they in following instructions )
If the outputted numbers make no sense:
Try checking the aircraft in front of (below) the delays. Is there a time gap in front of him?
Also check all relevant FLEGs to see if they are correct, as they are used for the sequencing calculations.
If the final keeps getting longer: Maybe the arrival rate has to be lowered (See 3.3.2).
Alternatively, you can manually put in a slot behind one of the arrivals, in an attempt to give DIR a chance to catch up, and shorten the final.
When planning a runway change: Use time based slots to facilitate a smooth runway change, preventing that arrivals are planned to land on both runways at the same time (unless that is allowable).
When relieving the MASTER:
1. The relieving controller connects as SLAVE, (to fetch the planned sequence).
2. The relieved MASTER disconnects by selecting Standalone or SLAVE.
3. The relieving controller connects as MASTER.