Make sure that you are running the **currently recommended version** of Euroscope, as listed above. Older versions may not have as much functionality, and newer versions may not be as stable.
### Step 2: Disable Auto METAR Addition *(Optional – Recommended for C1+ Controllers)*The below is optional, because the issue of METAR list clutter is generally only an issue for C1+ controllers controlling BIRD, due to the amount of airports that may be "active" under their airspace. For APP/TWR/GND/DEL positions, controllers may find it easier to leave "Auto display METARs" **ticked.** With only 1-2 active airports at most, there is no clutter in the METAR list, and it saves time to have the METARs for those airports displayed automatically by Euroscope.
For BIRD controllers covering Iceland top-down, to make sure that Euroscope correctly recognizes that you are responsible for departures and arrivals for Icelandic airports (including AFIS fields), all these airports are added as "active" airports whenever you log on as BIRD. Unfortunately, this also means that Euroscope will try to add the METAR for every Icelandic airport which BIRD may be responsible for. This is because of how Euroscope currently handles the addition of METARs to the METAR list. This can cause a lot of clutter for BIRD controllers in the METAR list. Thus, it is recommended to follow these steps as a workaround. **Go to OTHER SET (in the green toolbar), click on "General Settings," and then UNTICK "Auto display METAR of active airports."** (The red option highlighted below.) [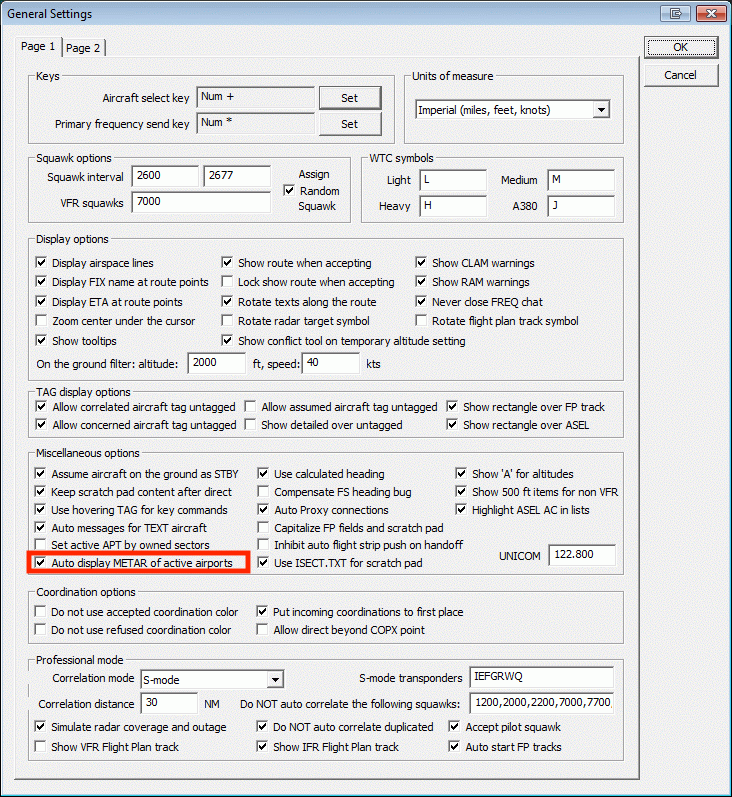](https://wiki.vatsim-scandinavia.org/uploads/images/gallery/2024-09/ksnimage.png) This will mean that when you log onto any position, **no METARs will be added automatically.** You may add METARs *manually* to the METAR list for the airports you need by typing the command `.qd [ICAO code]`, e.g. `.qd BIKF`. Pressing the **F2** key is a shortcut for the `.qd` text command. ## Logging Onto The Network To connect to VATSIM (or Sweatbox, the training server used for mentoring controllers), click on the big "CONNECT" button at the top-left of your Euroscope window. A window will pop up asking for the details of your connection. Make sure that you review the following settings: - **Select Connection Mode:** For typical controlling & observing on VATSIM, or if you are a *student* participating in a Sweatbox mentoring session, you should always select **"Direct to VATSIM."** - *"Start SweatBox simulator session"* is for **mentors only**. Students should never need to select it. - Ignore the other options unless you really know what you are doing. - **Callsign:** If you are logging onto a specific ATC position, use the dropdown menu to select it. - Selecting a position from the dropdown menu will automatically populate your INFO lines, as well as your Facility type. - If you are logging on as an observer, then manually type in your callsign as **\[YOUR INITIALS\]\_OBS.** E.g., If John Smith were logging on as an observer, their callsign should be **"JS\_OBS."** - You will also need to manually change your **Facility** (dropdown menu directly to the right of Callsign) to **"Observer."** - You may sometimes need to change your observer callsign if someone else with the same initials is also logged on, but this is very rare. - **Real Name:** Input your name or CID here, following the approved name conventions outlined in [VATSIM Code of Conduct section A4(b)](https://vatsim.net/docs/policy/code-of-conduct#a-general-rules-of-conduct). - **Certificate:** Input your VATSIM CID here. - **Password:** Input your VATSIM password here. - **Server:** If you are logging onto VATSIM itself, select "AUTOMATIC." If you are logging onto Sweatbox for a training session, select "SweatBox." - Whether you are on the main VATSIM network, or on Sweatbox, the **Connect to VATSIM** checkbox should **always be ticked.** (Sweatbox is not part of the "main" VATSIM network, but it is still operated by VATSIM.) Once you have reviewed all of the above items, you should be ready to connect to the network! If you are an advanced/knowledgeable controller, and know what you are doing, you may also consider reviewing the following items: - **Logoff time:** Pretty self-explanatory. Lists when you plan to log off in UTC (Zulu) time. - **INFO lines:** These lines, which provide essential information about your ATC position, are usually auto-populated whenever you select an ATC position in the Callsign dropdown. - However, controllers may sometimes wish to add additional information to the INFO lines, e.g., adding their CPDLC logon (if choosing to provide CPDLC service), or providing a link to their livestream (e.g., on Twitch.) - In these circumstances, controllers may make appropriate edits to the INFO lines. Any edits/additions should be kept brief & concise. **Controllers should generally never touch the "Range" setting, unless specifically advised to do so.** Position ranges are carefully adjusted to provide full coverage over a controller's airspace, without violating VATSIM's maximum visibility ranges (as defined in VATSIM Code of Conduct section C8.) ## Connecting an ATIS Thanks to the help & support of one of our controllers, Ollie Killean, the sector file is automatically configured with Euroscope to generate an ATIS. At the top of your Euroscope window, you should see four small boxes labeled with dashes. [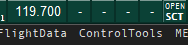](https://wiki.vatsim-scandinavia.org/uploads/images/gallery/2024-02/image.png) These represent the four ATIS's that you are allowed to connect to VATSIM. **These are set up for BIKF, BIRK, BIAR, and BGGH, in that order left-to-right.**As a reminder, TWR controllers may only connect **one** ATIS — the one for the aerodrome they are controlling. APP & CTR controllers may connect multiple ATISes if they are covering multiple aerodromes top-down. **Given current SOP, there should never be an instance in which all four ATIS's are connected at once, since there is no single ATC position that controls BIKF, BIRK, BIAR, and BGGH top-down.**
To connect an ATIS, firstly, **select your active runways in Euroscope.** Then, click on the box corresponding to the airport whose ATIS you want to connect (e.g., to connect an ATIS for BIKF, click on the leftmost box.) An ATIS setup window will open. [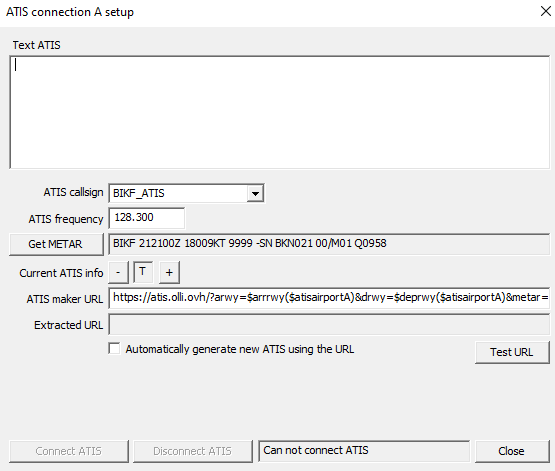](https://wiki.vatsim-scandinavia.org/uploads/images/gallery/2024-02/H43image.png) Tick **"Automatically generate new ATIS using the URL,"** and then click **"Test URL."** The Text ATIS section will automatically fill up with the appropriate ATIS text for your aerodrome, for example: [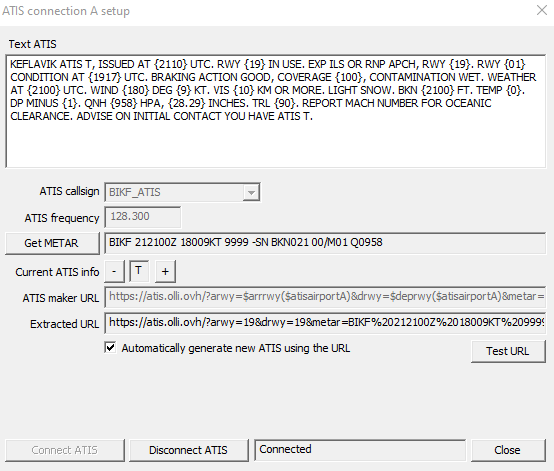](https://wiki.vatsim-scandinavia.org/uploads/images/gallery/2024-02/Jemimage.png) Check that the output looks correct (correct active runway included, etc.) If everything looks good, click **"Connect ATIS"** at the bottom-left of the window. You can then close the ATIS setup window. The boxes at the top left of your screen will change from showing dashes, to showing the current ATIS letter. [](https://wiki.vatsim-scandinavia.org/uploads/images/gallery/2024-02/s4Nimage.png) If you need to disconnect an ATIS (e.g., you are on APP/CTR and a controller has logged onto TWR beneath you, and they will take over the ATIS connection), simply click **"Disconnect ATIS."** (If you are closing/logging off VATSIM, you do not need to click "Disconnect ATIS" — just disconnect yourself from the network, and all your ATISes will disconnect with you.) ## Optional Features ### RDF RDF, or **Radio Direction Finder,** is a system used by some air traffic management systems which finds and indicates the location of incoming radio signals, allowing ATC to pinpoint who is transmitting. RDF is not used in real life by Reykjavik ACC. However, as some controllers find RDF a helpful tool when controlling the large bandboxed BIRD airspace, options for it are present – but disabled by default – in the BIRD sector file. When enabled, the TopSky plugin will draw a circle around any aircraft currently transmitting. **To enable RDF, follow these instructions:** - Go to `%AppData%\Euroscope\BIRD\Plugins` and open **TopSkySettings.txt.** - Find the settings below in the text file: ``` ; -- RDF -- // -- RDF is not used IRL in the BIRD FIR, but you can enable it anyway by removing the slashes // below -- // RDF_Mode=1 // RDF_AntennaPos=0 ``` - Remove the slashes `//` from in front of the bottom two lines (`RDF Mode=1` and `RDF_AntennaPos=0`) - Save the text file and close it.The TopSky implementation of RDF only works with the "AFV for VATSIM" client. It does **not** work with TrackAudio or other such alternative solutions.
## Updating Your Software ### Euroscope**Do not update Euroscope unless advised to.**
**The most stable version of Euroscope is not always the newest one.** Euroscope's development process can be somewhat unstable, and new releases may have bugs that break or lower the quality of the controlling experience. If the facility engineer has announced that controllers should update to a new version of Euroscope, follow the instructions provided by the facility engineer to update Euroscope. (Generally, you will just need to download the new installer from the Euroscope website.) Otherwise, **do not update** your Euroscope install. ### Sector File Proceed to this link [Sectorfile](https://wiki.vatsim-scandinavia.org/books/software-resources/page/sectorfile-download-setup) to find out where to download and setup your Sectorfile within Eurocope.