Basics
Sweatbox is a complex tool that takes time to properly utilize to it's full potential. The pages in this chapter will guide you through most things you need to know in order to conduct a session both on ground and in the air.
Starting a simulator session
Ways to participate
There are three main ways to participate in a Sweatbox session:
- Running the scenario
- Join as pseudo pilot
- Join as student or additional controller
It is possible to have multiple Pseudo pilots and simulation of individual aircraft can be transferred between them. In practice this means that it is possible to have one Pseudo pilot on ACC and another on APP for the same scenario.
When you connect and run a scenario, you will automatically be a Pseudo pilot as well.
How to connect
There are two sweatbox servers available for use. The main server is available in the connection dialogue by default, named "Sweatbox".
The second server can be used by changing the server field to sweatbox-2.vatsim.net. This must be done by all participants.
This means that if you run a scenario on ENBR APP and Denmark runs a session on EKDK CTR, your aircraft will show for them and vice versa. Be sure to delete any aircraft that may enter EKDK airspace in this case.
Avoid using the same server when there is an overlap in airspace. If you are planning a session on ENBR TWR and someone else is using the server for ENBR GND, there will be a conflict. Use the other server instead.
Run a scenario
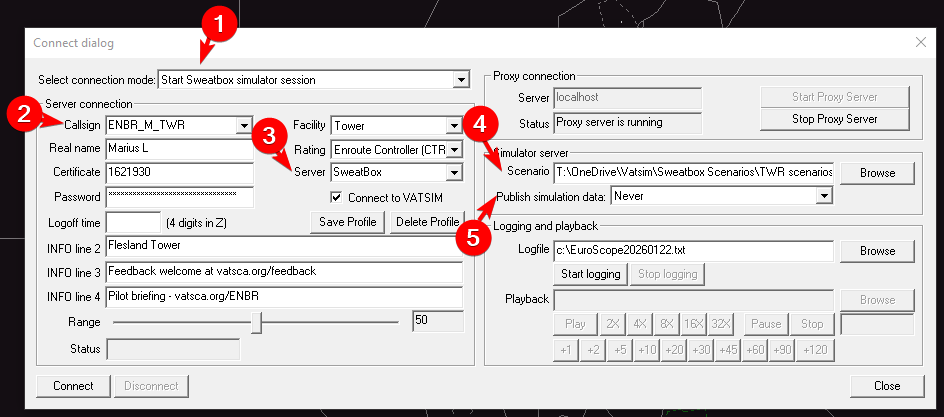
Connection dialog set up to run the session.
- Connection mode set to "Start Sweatbox simulator session"
- Use a callsign that doesn't conflict with any other position. Depending on the scenario file, you may have to use a specific Pseudo callsign
- These are defined in the scenario file.
Example: INITIALPSEUDOPILOT:ENBR_M_TWR
- These are defined in the scenario file.
- Connect to the Sweatbox server. Change to server 2 if necessary.
- Select the scenario to run from your local disk
- If you are the only pseudo pilot, set to Never. Select "To Pseodo pilot only" if there are multiple Pseudo pilots participating
Join as a pseudo pilot
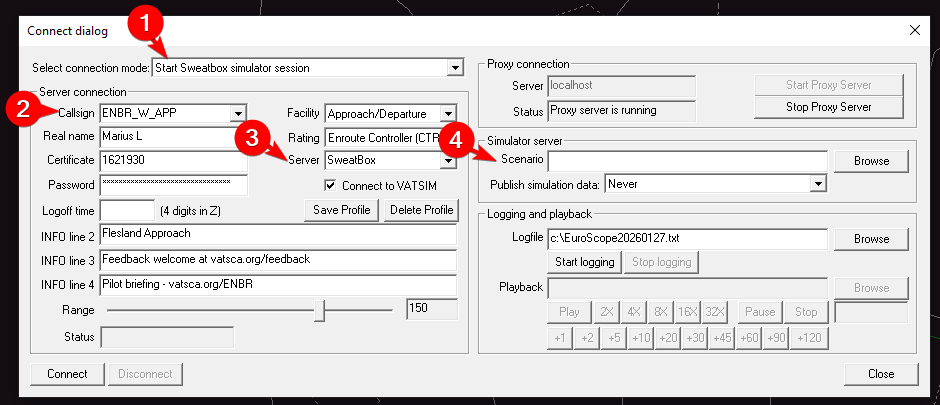
Connecting as an additional pseudo pilot is very similiar to running the scenario. The only exception is to leave the scenario field (4) blank.
- Connection mode set to "Start Sweatbox simulator session"
- Use the relevant callsign, usually for a position you will control
- Change the server
- Leave scenario field blank
How students shall connect
Connecting to sweatbox as a student is very simple. They log on exactly as they would on the network with the correct callsign for the position they will control, but the only exception is changing "Server" to either Sweatbox or the address for server 2 if used.
Taking control
The Simulator Control Ribbon
 The Simulator Control Ribbon appears below the main menu area at the top when connecting with “Start Sweatbox Simulator session”. It is grouped into the following areas:

A fixed information area

Route ribbon

Status ribbon

Approach ribbon

Ground simulator ribbon

Takeoff ribbon

Emergency ribbon

Lights and time acceleration ribbon

Pause/play button