Software Setup Guide
This guide details how to install the software necessary to control in the Reykjavik CTA (Iceland, Greenland, and the Faroe Islands) on VATSIM.
If you have any questions, please contact the current facility engineer for the Reykjavik CTA. The current Reykjavik CTA facility engineer is Jonathan Fong (1308253).
Required Software
Two key pieces of software are required to control in the Reykjavik CTA:
- Euroscope – The controller client used in the Reykjavik CTA (and throughout VATSIM Scandinavia).
- Note as of 21/02/2024: The currently recommended (most stable) version of Euroscope is v3.2.3. There are newer versions available, but there are significant bug reports relating to them, and therefore it is not recommended to use them.
- Link to v3.2.3: https://euroscope.hu/install/EuroScopeSetup.3.2.3.msi
- Link to v3.2.3: https://euroscope.hu/install/EuroScopeSetup.3.2.3.msi
- Note as of 21/02/2024: The currently recommended (most stable) version of Euroscope is v3.2.3. There are newer versions available, but there are significant bug reports relating to them, and therefore it is not recommended to use them.
- Audio for VATSIM (AFV) Standalone Client – This client is necessary to connect to the VATSIM audio servers, as EuroScope still hasn’t been updated to natively support the new Audio for VATSIM (AFV) codec.
- Link: https://audio.vatsim.net/docs/atc/euroscope
- It is also theoretically possible to use the "VectorAudio" client. However, that client is not 100% compatible with some features/plugins of the Reykjavik CTA setup, so the AFV standalone client is recommended.
Windows is required for both these pieces of software. MacOS and Linux users must use a virtual machine to run Windows and control. (Some have experimented with using Wine, but with varying degrees of success — such installs are at your own risk.)
Setup Guide
Step 1: Install Euroscope
Download and install Euroscope from the link above.
Make sure that you are running the currently recommended version of Euroscope, as listed above. Older versions may not have as much functionality, and newer versions may not be as stable.
Step 2: Install the AFV Standalone Client
This step is fairly easy — download install the AFV standalone client from the link above.
Step 3: Download the Sector File
The sector file, strictly speaking, is the file that contains all the airspace data for the Reykjavik CTA. The term "sector file" is also commonly used to refer to the associated settings files, plugins, etc. that make it possible to control in the Reykjavik CTA.
The Reykjavik CTA uses the platform Aeronav GNG to distribute updated sector files. Controllers should configure Euroscope to automatically download the most up-to-date sector file from Aeronav GNG. To do this, follow these instructions:
- If you are reinstalling the sector file because of any bugs/issues with an old install, go to
%AppData%/Euroscopeand delete all existing folders & files that have names starting with "BIRD."- If you had a very old install of Euroscope before as well, you may also need to go to
Documents/Euroscopeand do the same thing. - For advanced users: Be sure to save any custom settings files that you want to keep in your new install!
- If you had a very old install of Euroscope before as well, you may also need to go to
- Launch Euroscope from the shortcut created during install (search "Euroscope" in the start menu.) Euroscope may ask you to select a profile — you can just ignore this by pressing ESC. (Euroscope will then load up with a blank radar scope.)
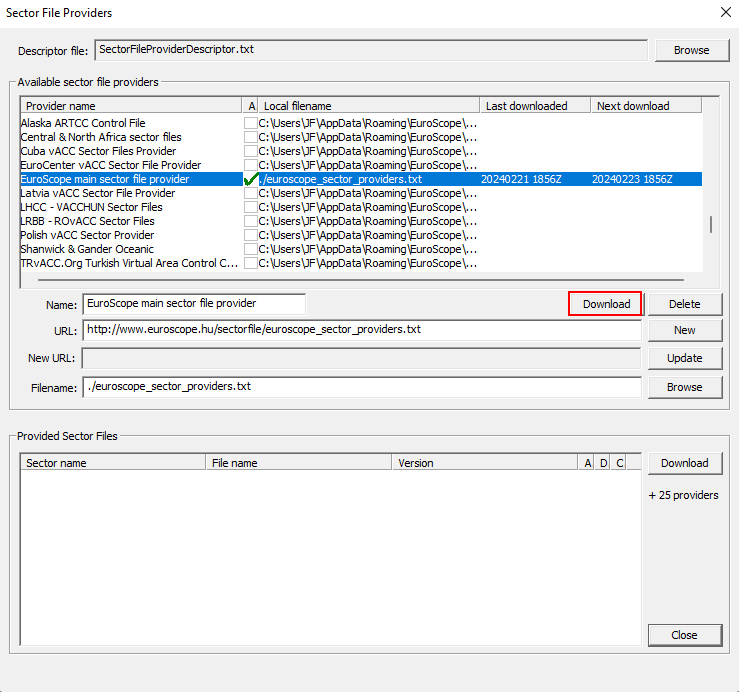
- In the green toolbar at the top of your screen, click "OPEN SCT," then in the dropdown menu that opens up, click “Download Sector Files."
- Click "Euroscope main sector file provider", then press the “Download" button in the middle-right of the window (outlined below in red.)

- Many more providers will now show up. Find “AeroNav GNG Sector File Provider,” tick "A" next to it, and press the middle-right “Download" button again.
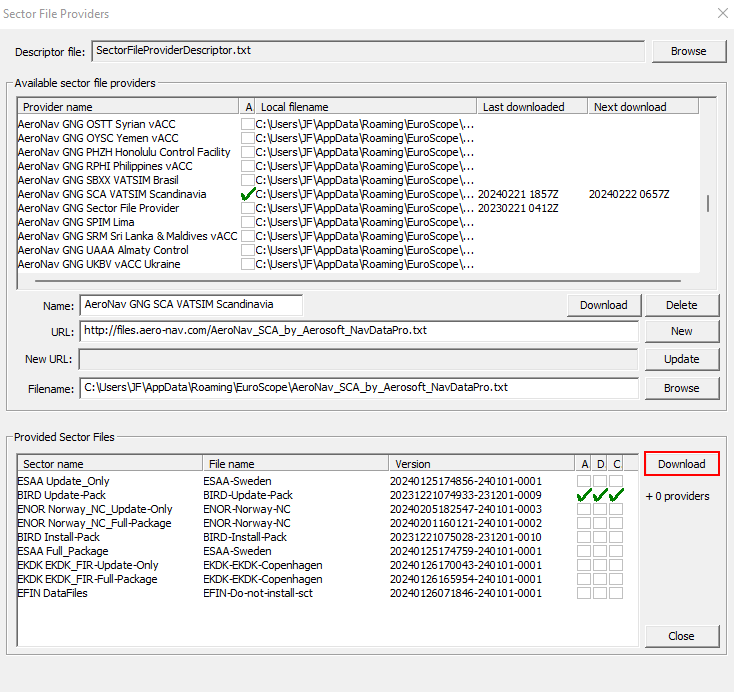
- Once this is done, even more providers will show up. Find "Aeronav GNG VATSIM Scandinavia," tick "A" next to it, and press the middle-right “Download" button again.
- In the bottom half of your screen, you will see the "Provided Sector Files" section fill up with a big list of sector files. Click on the one named "BIRD Install-Pack" and press the bottom-right Download button (not the one you were pressing earlier! See screenshot below.)

- Once that is done downloading (the "D" column next to BIRD Install-Pack will be ticked), click on "BIRD Update-Pack" and press the bottom-right download button again.
- Tick "A" next to BIRD Update-Pack. This will ensure your Euroscope will download updated sector files automatically.
- Close Euroscope. If Euroscope asks you to save anything, just click on "No" or "Cancel All."
- Relaunch Euroscope. When Euroscope asks you to select a profile, this time, select "BIRD_TopSky.prf."
- Congratulations! If you've done everything correctly, you should be looking at a blue/green/grey radar scope depicting the Reykjavik CTA's airspace.
Logging Onto The Network
To connect to VATSIM (or Sweatbox, the training server used for mentoring controllers), click on the big "CONNECT" button at the top-left of your Euroscope window.
A window will pop up asking for the details of your connection. Make sure that you select/input your:
- Select Connection Mode: For typical controlling/observing on VATSIM, or if you are a student in a Sweatbox mentoring session, you should always select "Direct to VATSIM."
- "Start SweatBox simulator session" is for mentors only. Students should never need to select it.
- Ignore the other options unless you really know what you are doing.
- Callsign: If you are logging onto a specific ATC position, use the dropdown menu to select it.
- Selecting a position from the dropdown menu will automatically populate your INFO lines, as well as your Facility type.
- If you are logging on as an observer, then manually type in your callsign as [YOUR INITIALS]_OBS. E.g., If John Smith were logging on as an observer, their callsign should be "JS_OBS."
- You will also need to manually change your Facility (dropdown menu directly to the right of Callsign) to "Observer."
- You may sometimes need to change your observer callsign if someone else with the same initials is also logged on, but this is very rare.
- Selecting a position from the dropdown menu will automatically populate your INFO lines, as well as your Facility type.
- Real Name: Input your name here, following the approved name conventions outlined in VATSIM Code of Conduct section A4(b).
- Certificate: Input your VATSIM CID here.
- Password: Input your VATSIM password here.
- Server: If you are logging onto VATSIM itself, select "AUTOMATIC." If you are logging onto Sweatbox for a training session, select "SweatBox."
- Whether you are on the main VATSIM network, or on Sweatbox, the Connect to VATSIM checkbox should always be ticked. (Sweatbox is not part of the "main" VATSIM network, but it is still operated by VATSIM.)
Once you have reviewed all of the above items, you should be ready to connect to the network!
If you are an advanced/knowledgeable controller, and know what you are doing, you may also consider reviewing the following items:
- Logoff time: Pretty self-explanatory. Lists when you plan to log off in UTC (Zulu) time.
- INFO lines: These lines, which provide essential information about your ATC position, are typically auto-populated whenever you select an ATC position in the Callsign dropdown.
- However, controllers may sometimes wish to add additional information to the INFO lines, e.g., adding their CPDLC logon (if choosing to provide CPDLC service), or providing a link to their livestream.
- In these circumstances, controllers may make appropriate edits to the INFO lines. Any edits/additions should be kept brief & concise.
Controllers should generally never touch the "Range" setting, unless specifically advised to do so by the facility engineer. Position ranges are carefully adjusted to provide full coverage over a controller's airspace, without violating VATSIM's maximum visibility ranges (as defined in VATSIM Code of Conduct section C8.)
Connecting an ATIS
There are currently two accepted ways of connecting an ATIS as a controller in the Reykjavik CTA.
Euroscope ATIS Generator
Thanks to the help & support of one of our controllers, Ollie Killean, the sector file is automatically configured with Euroscope to generate an ATIS.
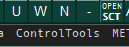
At the top of your Euroscope window, you should see four small boxes labeled with dashes.
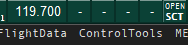
These represent the four ATISes that you are allowed to connect to VATSIM. In the Reykjavik CTA, we only have three airports with an ATIS (BIKF, BIRK, BIAR). Therefore, the leftmost box is for BIKF's ATIS, the second from the left is for BIRK's ATIS, the third from the left is for BIAR's ATIS, and the fourth one is non-functional.
As a reminder, TWR controllers may only connect one ATIS — the one for the aerodrome they are controlling. APP & CTR controllers may connect multiple ATISes if they have multiple aerodromes under their responsibility, which they are covering top-down.
To connect an ATIS, firstly, select your active runways in Euroscope. Then, click on the box corresponding to the airport whose ATIS you want to connect (e.g., to connect an ATIS for BIKF, click on the leftmost box.)
An ATIS setup window will open.
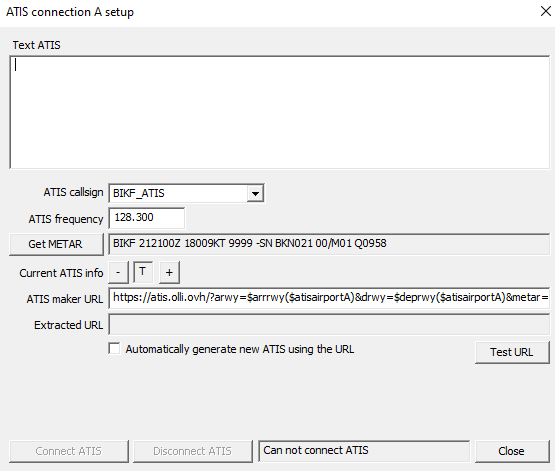
Tick "Automatically generate new ATIS using the URL," and then click "Test URL." The Text ATIS section will automatically fill up with the appropriate ATIS text for your aerodrome, for example:
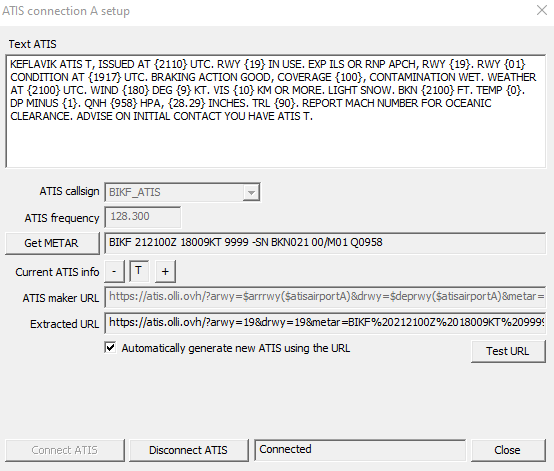
Check that the output looks correct (correct active runway included, etc.) If everything looks good, click "Connect ATIS" at the bottom-left of the window. You can then close the ATIS setup window. The boxes at the top left of your screen will change from showing dashes, to showing the current ATIS letter.
If you at any point need to disconnect an ATIS (e.g., you are on APP/CTR and a controller has logged onto TWR beneath you, and will take over the ATIS connection), simply click "Disconnect ATIS." (If you are closing/logging off VATSIM, you do not need to click "Disconnect ATIS" — just disconnect yourself from the network, and all your ATISes will disconnect with you.)
vATIS
vATIS is a separate program which controllers may use in lieu of Euroscope to connect an ATIS to VATSIM.
Instructions for setting up vATIS may be found here: https://vatsim-scandinavia.org/forums/topic/4371-reykjavik-cta-vatis-profile/
Updating Your Software
Euroscope
Do not update Euroscope unless the facility engineer has specifically announced that you should do so. Euroscope's development process tends to be somewhat unstable, and new releases may have bugs that break or lower the quality of the controlling experience.
If a new stable version of Euroscope has been released, and the facility engineer has announced that controllers should update to it, follow the instructions provided by the facility engineer to update Euroscope. (Generally, you will just need to download the new installer from the Euroscope website.)
Sector File
If you've followed all the steps listed above, then your sector file will automatically update whenever a new version is released. (Generally, every 1-3 AIRAC cycles. There may not be an update every AIRAC cycle, as some cycles do not have any significant changes within our airspace.)
This means that when you start Euroscope, you may sometimes receive a notification that a new sector file has been downloaded. Euroscope will ask you if you want to use the new sector file in all of your ASR files (radar views), and if you want to delete the old sector file. Click on "yes" to both prompts.
AFV Standalone Client
The AFV client will prompt you on startup if there is a new version to download. Follow the prompts the AFV client gives you to update itself.