RIU 22R/22L - TWR + GND
EKCH_A_TWR
- You are in control of Cargo Apron and Hangar area. You may delegate to C_TWR if needed
- Familiarize yourself with Missed Approach procedure for the correct RWY!
- If getting RED conflicts, but it is clear the preceding will vacate before trailing touches down you are OK to continue. Issue TFC information with landing clearance
Standard missed approach procedure MUST be given ALWAYS unless coordinated otherwise.
Missed approach 22L
Left heading 187, climb 3000’
Handover to EKCH_O_APP 118.455
Missed approach should be announced as:
“Follow Standard Missed Approach procedure, Climb 3000”
Or if the pilot is struggling:
"GO AROUND! Left turn NOW heading 187 climb 3000 ft."
You should issue a Go- Around IF
- Separation is LESS than 2NM (Yellow Conflict sticker) while both aircraft are still on the ILS
- Aircraft will touch down before the preceding has vacated.
Only give Go Around if needed. Every go around is a big strain on APP/F_APP.
Correlation with EKCH_C_TWR
BE AWARE of this to ease congestion and workload for the next controller
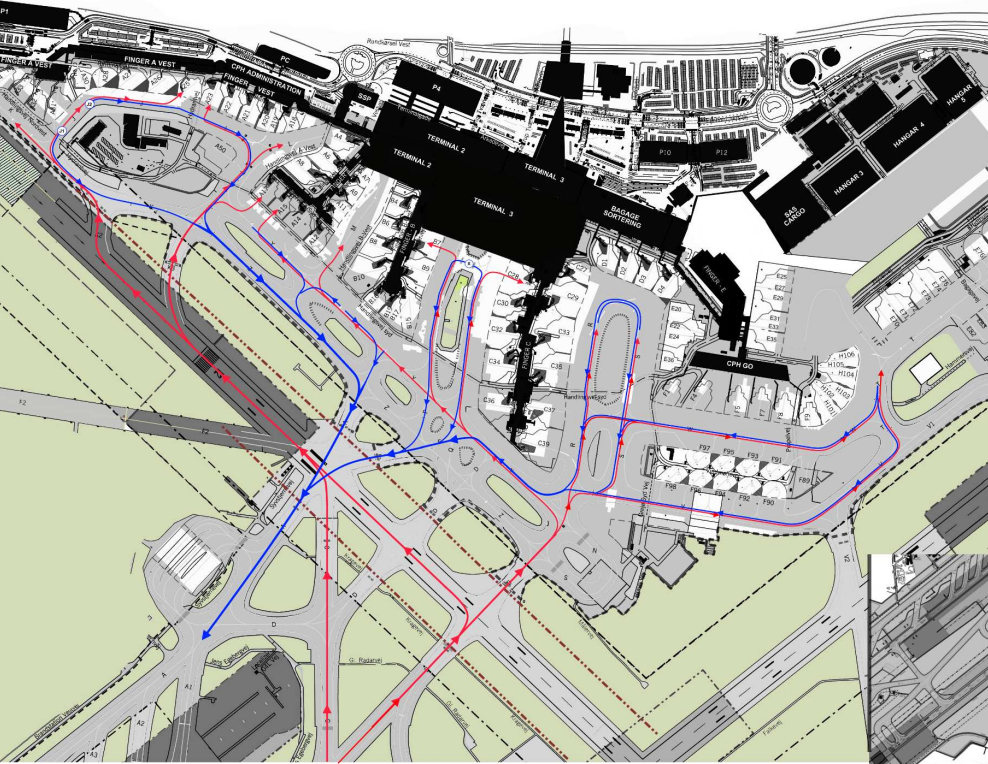
| Taxi Route | For gates | Handover to |
| Via B cross 30 hold short Z | All B,C,D,E,F + A7-A15 | EKCH_A_GND |
| Via B hold short C | A4-A8 + A17-A34 |
EKCH_C_TWR |
| Via B hold short RWY30 (If vacating B5) | ||
| Via B, left onto RWY30 hold short D (If vacating B5) |
Note that
- You can handover to EKCH_A_GND directly for traffic via B to hold short Z
- You must handover before reaching C for traffic to EKCH_C_TWR
- You can choose to taxi airplanes up to hold short D if congestion seems to be an issue at the B/30 intersection
EKCH_D_TWR (22R)
| Northwest | Southwest | Southeast | West | North |
| KEMAX | LANGO NEXEN KOPEX |
SIMEG SALLO |
ODN | GOLGA VEDAR |
| Contact EKCH_W_DEP: 120.255 If EKCH_DEP is Offline then contact: |
||||
| EKCH_O_APP: 118.455 | EKCH_W_APP: 119.805 | |||
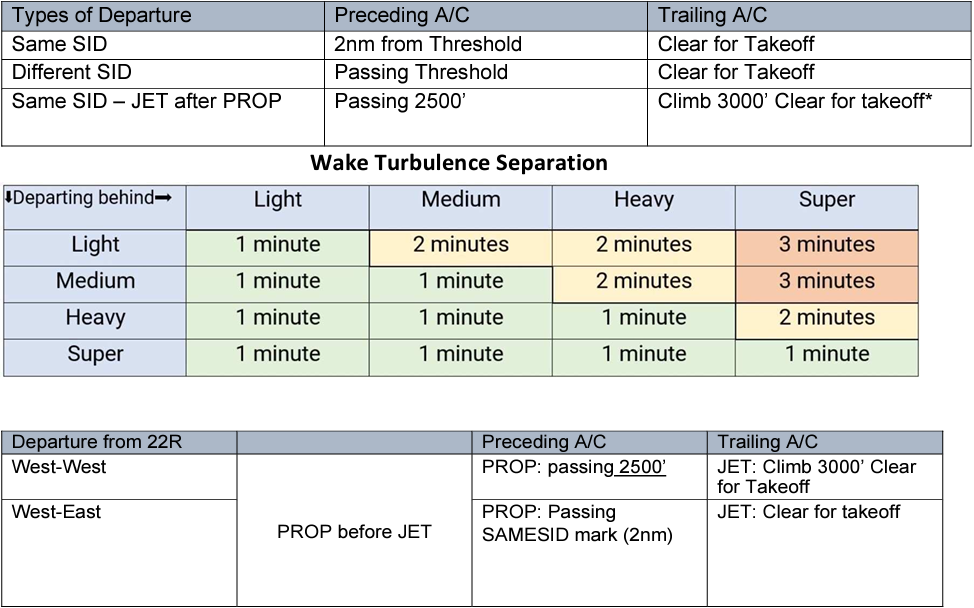
- See Wake Turbulence and Route separation below
- Check scenarios for PROP before JET
- Preceding MUST be past the Threshold before the next DEP CLR is given
EKCH_C_TWR
ONLY use standard taxi routes unless coordinated with EKCH_A_GND
- K2+K3 are STANDARD for inbounds to A4-A34 (Not including A11-A15).
- DO NOT ask before using
- DO NOT accept wrong taxiways. Vacating B5 or missing C should still taxi up the runway for K3/K2 if needed. DO NOT overcrowd EKCH_A_GND
Flights taxiing via B to hold short Z does NOT need you. A_TWR will Cross them directly.
You can use TWY D to any extend you like. Consider early coordination with TWR and GND
As aircraft crosses Runway 30, they should as good as you can be separated into South vs. North departures
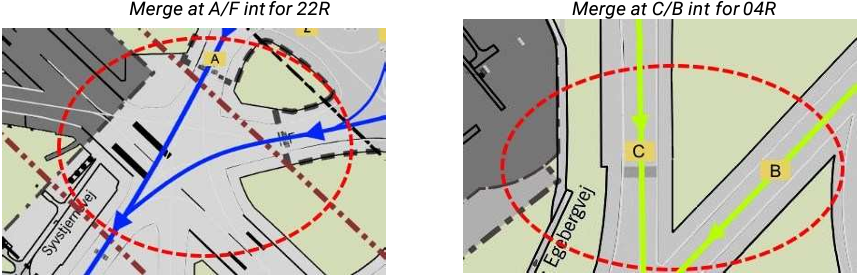
You should assign a holding point for the departures. hand over to EKCH_D_TWR latest passing De-Icing platform A. Note that
- All WTC/H must use A1
- If a WTC/H is at A1, A2 is not usable
- If two airplanes are cleared to A1, traffic cannot pass behind.
- A4 is the last used holding point. A5 is only for extraordinary circumstances
EKCH_A_GND
Make sure you know standard taxi routes & pushback routes!
- Once handed from S_GND/DEL TSAT is out of the picture
- Agree with EKCH_C_TWR about the use of taxiway D, Ideas could be:
-
-
-
- Inbounds or Outbounds for C28-C36
- Newbie pilots
-
-
-
- Adhere to “Release Points” to the greatest extent possible!
- Two WTC/H Aircrafts may not pass each other on Z/Y. Wingspan clearance is too little
- For split apron ops, adhere to 1 inbound 1 outbound at an intersection and observe hotspots:
- Do not use K3/K2 for outbounds, unless the situation specifically requires it. Coordinate before usage
EKCH_ D_GND
- Observe with split apron the Hotspots and how to manage without coordination
- Rule is, one controller has priority at a hotspot then the other controller taxies behind and the the first controller taxi as number three if more than two airplanes are at a hotspot
- EKCH_D_GND must observe no inbounds destined for that alley before commencing a pushback
- EKCH_A_GND must observe any ongoing pushbacks before taxiing into an alley
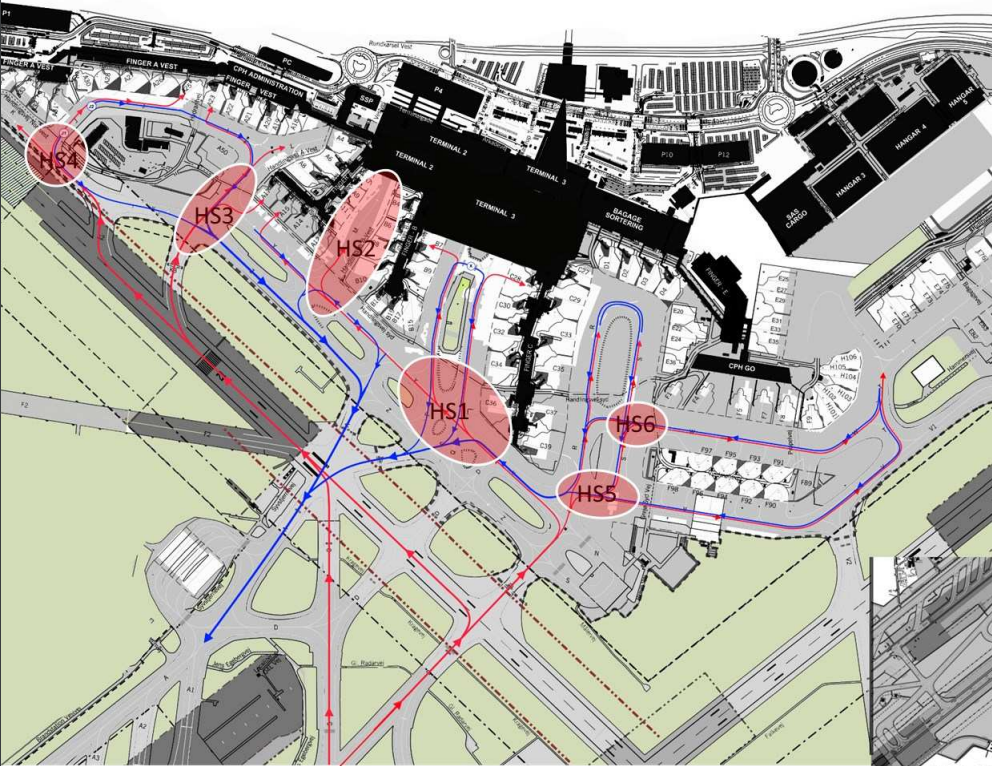
- HS1: Arrivals on Y goes first. Departures from Q/P goes behind. (NOTE different from 04R/04L)
- HS2: Arrivals must hold short Y and observe any ongoing pushback
- HS3: Arrivals on K3 must give way to first outbound and any subsequent blocking the ARR stand
- HS4: Departures from K must hold short J to give way to arrivals on K2.
- HS5: Departures from V must hold short of S to give way to first inbounds via K & R.
- HS5: Subsequent arrival should hold short of Y or Z to give way to beformentioned departure
- HS6: Departures from W must give way to first inbound at R & S