
Chapter 2 - Strip Design
1. Flight Strips
Flight Strips comes in two colors. A Blue strip for outbound flights, and a Yellow Strip for inbounds.
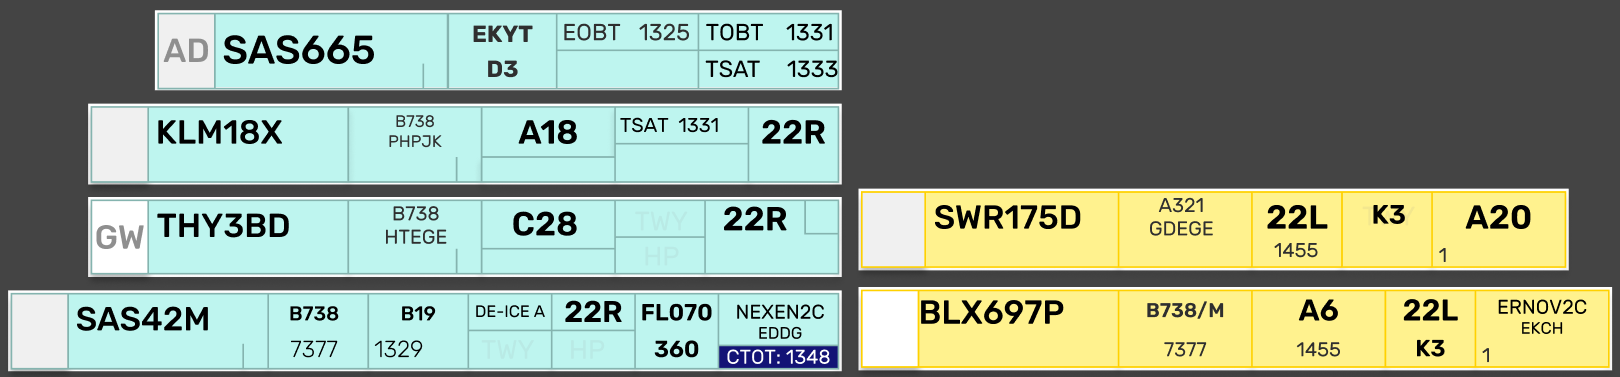
While the many different looks of strips may seem confusing at first, they are all based on the same fundamentals.
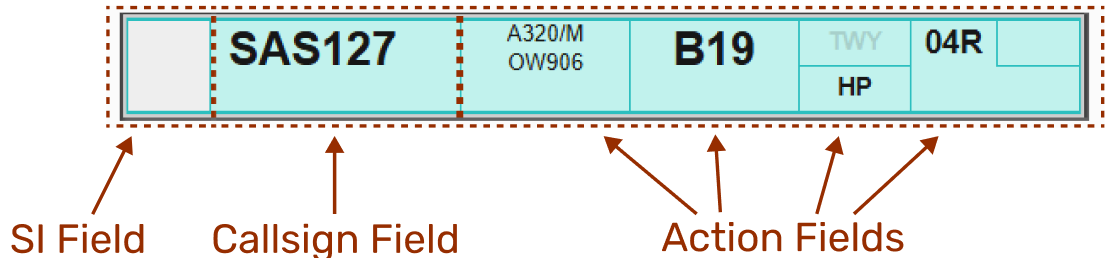
- SI Field
- A rectangular field, in three possible color combinations, with out without a two letter identifier.
- Description: The transfer/assume mechanism, indicating the owner of the strip.
- Operation: Click to Transfer/Assume
- Callsign Field
- A large field, containing the callsign of the aircraft the strip concerns.
- Description:The field of clicking to drag the strip around
- Operation: Click and hold to select the strip, and drag it to another bay, or
- Click to highlight to strip and click on a bay to move
- Operation: Click and hold to select the strip, and drag it to another bay, or
- Action Fields
- Everything else in the strip.
- Description: Various fields of action items and information items, depicted in six (6) possible formats.
- Operation: Each combination of action fields, depends on what is relevant for the stage of flight.
1. SI Field
The SI field has different colors depending on the state of ownership of the strip.
- Purple: when it is concerned, meaning you will receive ownership of this at some point, but not yet.
- Purple/White: In transfer towards YOU from previous controller
- White: Assumed and controlled by YOU
- White/Orange: In transfer towards next controller from YOU
- Orange: Transferred and accepted by next controller
The logic is identical to transfer/assume in COOPANS, only difference is Concerned in COOPANS is green instead of purple.
2. Callsign Field
The callsign field is one which you can click on. Clicking the callsign does two different things depending on whether or not you have assumed the strip (white color SI field).
NOT OWNED
Not assumed
Clicking on callsign field will open the “Callsign Menu” where you can select various submenus
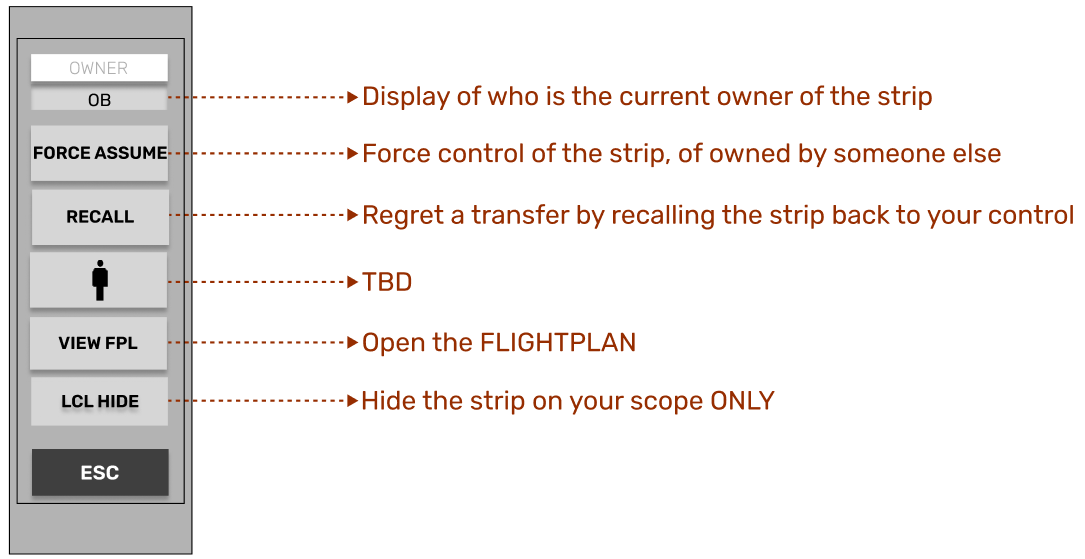
OWNED
Assumed
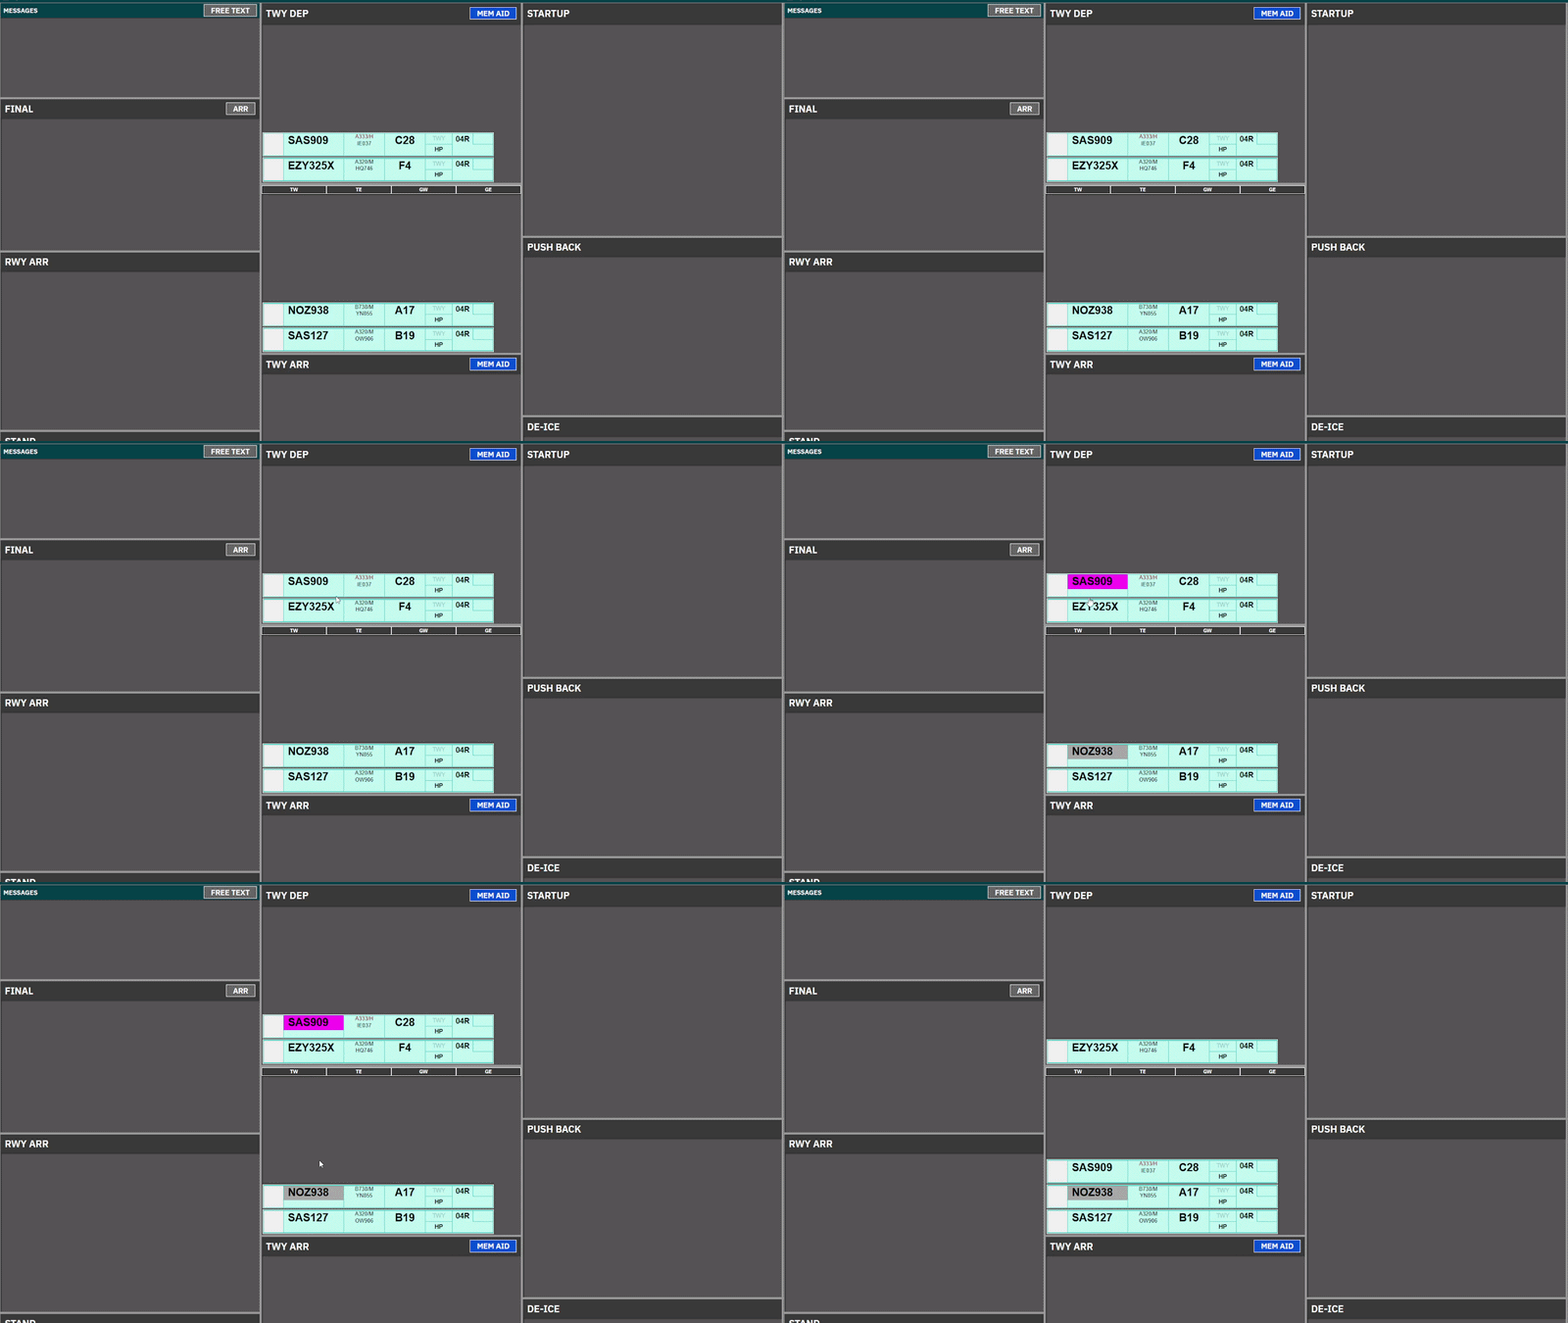
Clicking on the CALLSIGN field, will select the strip, made apparent by the purple fill color of the field.
It is common procedure to click and drag the strip to establish the correct sequence within the bay
- Holding the click down will allow you to drag the strip around.
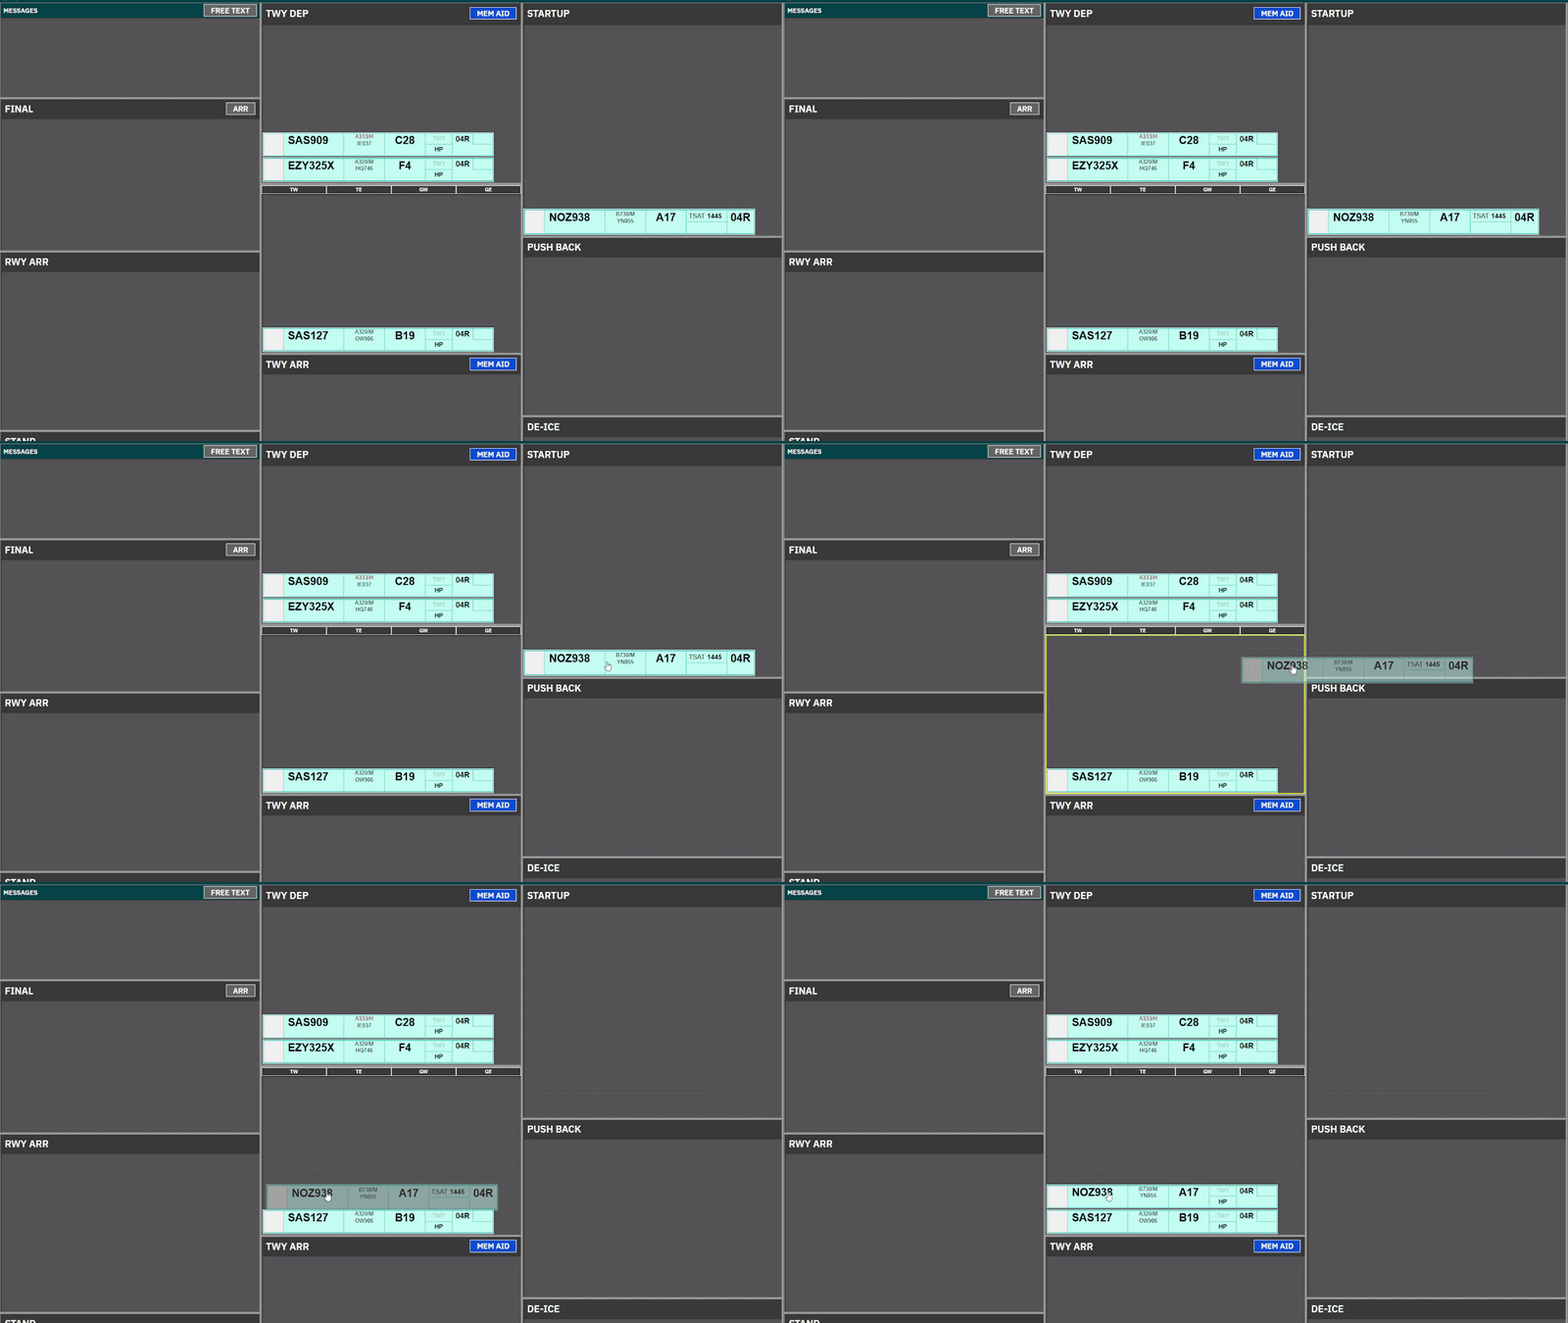
- Clicking on Strip and subsequently clicking on another bay will move the strip.
3. Action Fields
Various click spots, some to open menus, some are not clickable. There are six different version of Strips, each with action fields which are relevant to the phase of flight for the strip.
Over the different scopes, several different visual configurations are possible, and generally depending on the combination of Scope and Bay.
REF. | STRIP NAME | USED BY |
1.1 | DEL/SEQ Strip | CLR DEL & SEQPLN to provide ATC Clearance and CDM management. |
1.2 | START/PUSH Strip | ALL Controllers in STARTUP & PUSHBACK Bays to facilitate such. |
1.3 | TAXI-OUT STRIP | For Taxi-Out instructions, used by APRON for relevant holding points |
1.4 | TAXI-IN STRIP | For Taxi-In instructions, used by APRON for relevant stand info. |
1.5 | Expanded TAXI-OUT STRIP | For Taxi-Out instructions, used by TOWER for including departure info. |
1.6 | Expanded TAXI-IN STRIP | For Taxi-in, Used by TOWER for information on LDG RWY, timings and STAR. |
In the following sections we will go through the buildup of each strip, for you to reference. The actual usage of strip is described in each “operation” chapter.
END OF SECTION

1. Strip Design

1.1 DEL/SEQ Strip
DEL/SEQ Strip is a strip, containing only CDM information, and the needed clickspots to assign an ATC Clearance and Startup. This strip is used in
- All bays of the CLR DEL Scope.
- STARTUP bay of the SEQ PLN Scope.
DEL / SEQ Strip | |||
| |||
ID | Name | Description | Clickspot |
1 | SI Field | Click to Initiate Transfer | Yes |
2 | Callsign | Click to mark or open callsign menu. | Yes |
3 | Dest/Stand | Click on either to open ATC Clearance Dialogue | Yes |
4 | EOBT | Information on FPL filed EOBT | No |
5 | CTOT | CTOT assigned. Color coding/ops as per Chapter 8 - CDM Operation | No |
6 | TOBT | Information on latest TOBT. Color coding/ops as per Chapter 8 - CDM Operation | Yes* |
7 | DEP RWY | Information on latest TOBT Color coding/ops as per Chapter 8 - CDM Operation | No |


*Only in SEQ PLN Scope

1.2 START/PUSH Strip
PUSH/START Strip is a strip containing simplified CDM info as well as the features needed to provide pushback and engine starts. It is used in:
- All PUSHBACK and STARTUP bays on the scope with exception of:
- STARTUP bay in SEQ PLN
PUSH / START Strip | |||
| |||
ID | Name | Description | Clickspot |
1 | SI Field | Click to Accept Transfer Click to Initiate Transfer | Yes |
2 | Callsign | Click to Mark or open Callsign Menu | Yes |
3 | Reg / Type | Open FlightPlan | Yes |
4 | Stand | Open Airport Map for selection of clearance limit | Yes |
5 | DE-ICE | Showing platform for De-Ice if requested. Accompanied by snow icon below Ref/Type | No |
6 | TSAT | Information on latest TSAT. Color coding/ops as per Chapter 8 - CDM Operation | Yes |
7 | CTOT | Information on latest CTOT Color coding/ops as per Chapter 8 - CDM Operation | No |
7 | DEP RWY | Click to manually change Departure Runway | Yes |



1.3 TAXI-OUT Strip
TAXI-OUT Strip is used on TWY DEP for specifically Kastrup Apron controllers. This means it is visible only at:
- TWY DEP bay for following scopes:
- AA+AD, APRON DEP, APRON ARR
TAXIOUT Strip | |||
| |||
ID | Name | Description | Clickspot |
1 | SI Field | Click to Accept Transfer Click to Initiate Transfer | Yes |
2 | Callsign | Click to Mark or open Callsign Menu | Yes |
3 | Reg / Type | Open FlightPlan | Yes |
4 | Stand | Informational only (in case of return to stand) | No |
5 | DE-ICE | Showing platform for De-Ice if requested. Accompanied by snow icon below Ref/Type | No |
6 | TWY HS | Taxi clearance limit. Click to assign hold short | Yes |
7 | HP | Holding point. Click to assign Holding Point. | Yes |
7 | DEP RWY | Click to manually change Departure Runway | Yes |


1.4 TAXI-IN Strip
PUSH/START Strip is used on TWY ARR for specifically Kastrup Apron controllers. This means it is visible only at:
- TWY ARR bay for following scopes:
- AA+AD, APRON DEP, APRON ARR
TAXI-IN Strip | |||
| |||
ID | Name | Description | Clickspot |
1 | SI Field | Click to Accept Transfer | Yes |
2 | Callsign | Click to Mark or open Callsign Menu | Yes |
3 | Type / Reg | Click to open Flightplan | Yes |
5 | ARR RWY | Informational only | No |
6 | LDG Time | Informational only | No |
7 | TWY HS | Click to select taxi clearance limit Standard feeder route on default | Yes |
9 | Stand | Click to open Stand Assignment Tool | Yes |
10 | Marshaller | Detects if pilot has GSX through FlightStrips. Appears only if that is the case. Number denotes stop line | TBA |


1.5 Expanded TAXI-OUT Strip
Expanded TAXI-OUT Strip is used on TWY DEP for specifically Kastrup Tower controllers. The purpose of this strip is to accomendate more departure relevant information such as initial climb and assigned headings.
It is used for
- TWY DEP, RWY DEP and AIRBORNE bay for following scopes:
- GE+GE, TW+TE, TWR+GND
Expanded TAXI-OUT Strip | |||
| |||
ID | Name | Description | Bay |
1 | SI Field | Click to Accept Transfer Click to Initiate Transfer |
|
2 | Callsign | Click to Mark or open Callsign Menu |
|
3 | Type | Informational only |
|
4 | Squawk | Informational only |
|
5 | Stand | Informational only |
|
6 | EOBT | Informational only |
|
7 | DE-ICE | Showing platform for De-Ice if requested. |
|
8 | TWY HS | Taxi clearance limit. Click to assign hold short |
|
9 | DEP RWY | Click to change Departure Runway |
|
10 | HP | Click to assign Holding Point. |
|
11 | CFL | Cleared Flight Level. Click to change. SID level default |
|
12 | HP | Assigned Heading. Click to change. Blank by default |
|
13 | SID/Destination | Click to open FlightPlan |
|
14 | CTOT | Information only Color coding/ops as per Chapter 8 - CDM Operation |
|


1.6 Expanded TAXI-IN Strip
Expanded TAXI-IN Strip is used on TWY ARR for specifically Kastrup Tower controllers.
It is used for
- TWY ARR and RWY ARR and FINAL bay for following scopes:
- GE+GE, TW+TE, TWR+GND
Expanded TAXI-IN Strip | |||
| |||
ID | Name | Description | Bay |
1 | SI Field | Click to Accept Transfer Click to Initiate Transfer |
|
2 | Callsign | Click to Mark or open Callsign Menu |
|
3 | Type / WTC | Informational only |
|
4 | Squawk | Informational only |
|
5 | Stand | Click to open Stand Assignment Tool |
|
6 | LDG Time | Informational only |
|
7 | ARR RWY | Informational only |
|
8 | TWY HS | Click to select taxi clearance limit Standard feeder route on default |
|
9 | STAR/Dest | Click to open FlightPlan |
|
10 | Marshaller | Detects if pilot has GSX through FlightStrips. Appears only if that is the case. Number denotes stop line |
|
